Inspecting Changes with Diffs
Driving a project forward requires a myriad of small changes. Understanding each of these individual changes is the key to understanding how the project evolved.
While commands like "git status" or the plain "git log" command only inform you on a very broad level, there are other commands that display modifications in detail.

The Git Cheat Sheet
No need to remember all those commands and parameters: get our popular "Git Cheat Sheet" - for free!
Reading Diffs
In version control, differences between two versions are presented in what's called a "diff" (or, synonymously, a "patch"). Let's take a detailed look at such a diff - and learn how to read it.

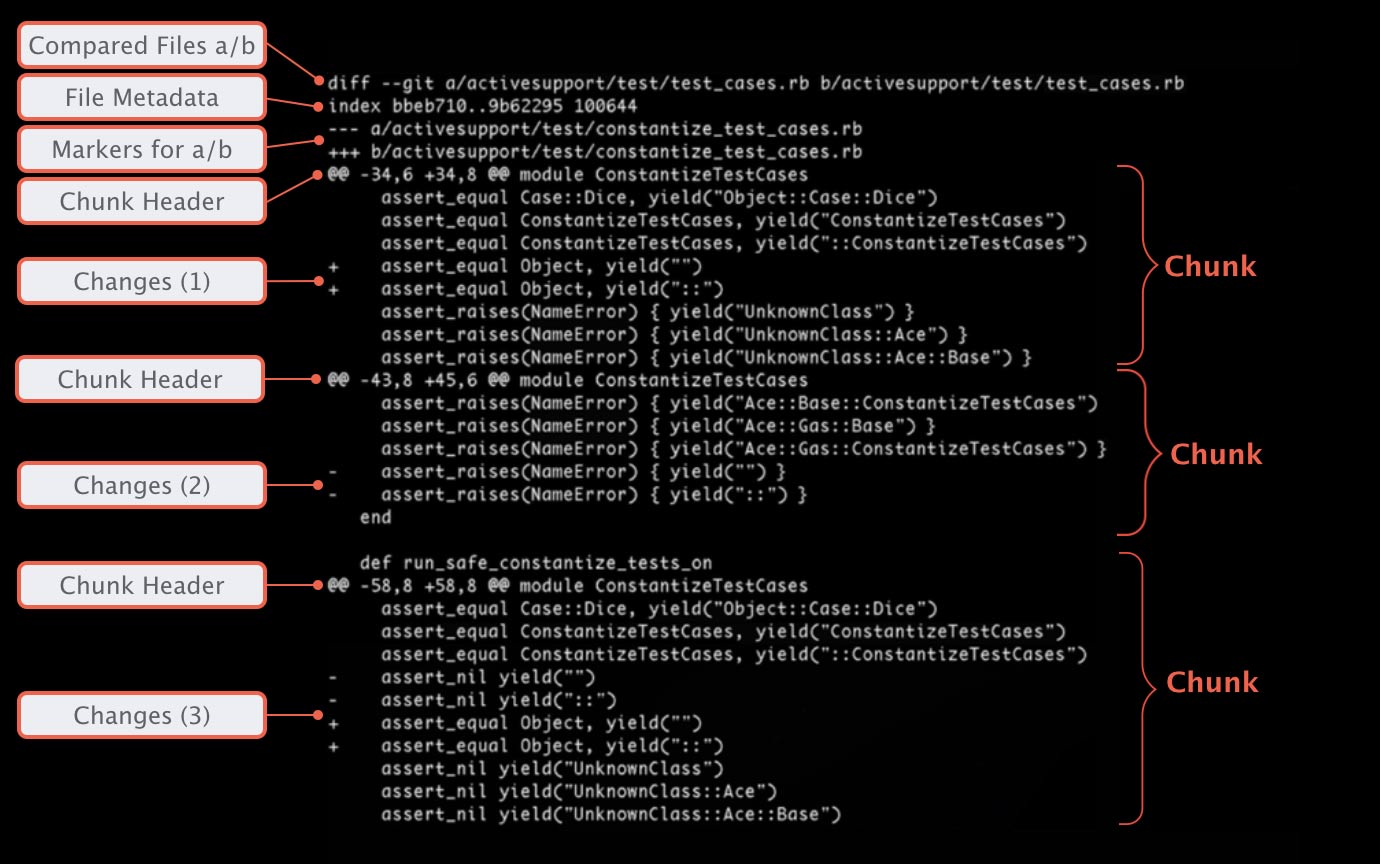
Compared Files a/b
Our diff compares two items with each other: item A and item B. In most cases, A and B will be the same file, but in different versions. Although not used very often, a diff could also compare two completely unrelated files with each other to show how they differ.
To make clear what is actually compared, a diff output always starts by declaring which files are represented by "A" and "B".
File Metadata
The file metadata shown here is a very technical information which you'll probably never need in practice. The first two numbers represent the hashes (or, simply put: "IDs") of our two files: Git saves every version not only of the project but also of each file as an object. Such a hash identifies a file object at a specific revision. The last number is an internal file mode identifier (100644 is just a "normal file", while 100755 specifies an executable file and 120000 represents a symbolic link).
Markers for a/b
Further down in the output, the actual changes will be marked as coming from A or B. In order to tell them apart, A and B are each assigned a symbol: for version A, this is a minus ("-") sign and for version B, a plus ("+") sign is used.
Chunk
A diff doesn't show the complete file from beginning to end: you wouldn't want to see everything in a 10,000 lines file, when only 2 lines have changed. Instead, it only shows those portions that were actually modified. Such a portion is called a "chunk" (or "hunk"). In addition to the actual changed lines, a chunk also contains a bit of "context": some (unchanged) lines before and after the modification so you can better understand in what context that change happened.
Chunk Header
Each of these chunks is prepended by a header. Enclosed in two "@" signs each, Git tells you which lines were affected. In our case the following lines are represented in the first chunk:
- From file A (represented by a "-"), 6 lines are extracted, beginning from line no. 34
- From file B (represented by a "+"), 8 lines are displayed, also starting from line no. 34
The text after the closing pair of "@@" aims to clarify the context, again: Git tries to display a method name or other contextual information of where this chunk was taken from in the file. However, this greatly depends on the programming language and doesn't work in all scenarios.
Changes
Each changed line is prepended with either a "+" or a "-" symbol. As explained, these symbols help you understand how exactly version A and B look: a line that is prepended with a "-" sign comes from A, while a line with a "+" sign comes from B.
In most cases, Git picks A and B in such a way that you can think of A/- as "old" content and B/+ as "new" content.
Let's look at our example:
- Change #1 contains two lines prepended with a "+". Since no counterpart in A existed for these lines (no lines with "-"), this means that these lines were added.
- Change #2 is just the opposite: in A, we have two lines marked with "-" signs. However, B doesn't have an equivalent (no "+" lines), meaning they were deleted.
- In change #3, finally, some lines were actually modified: the two "-" lines were changed to look like the two "+" lines below.
Now that we know how to read a diff output, let's generate some!
Tip
Diffs in Tower
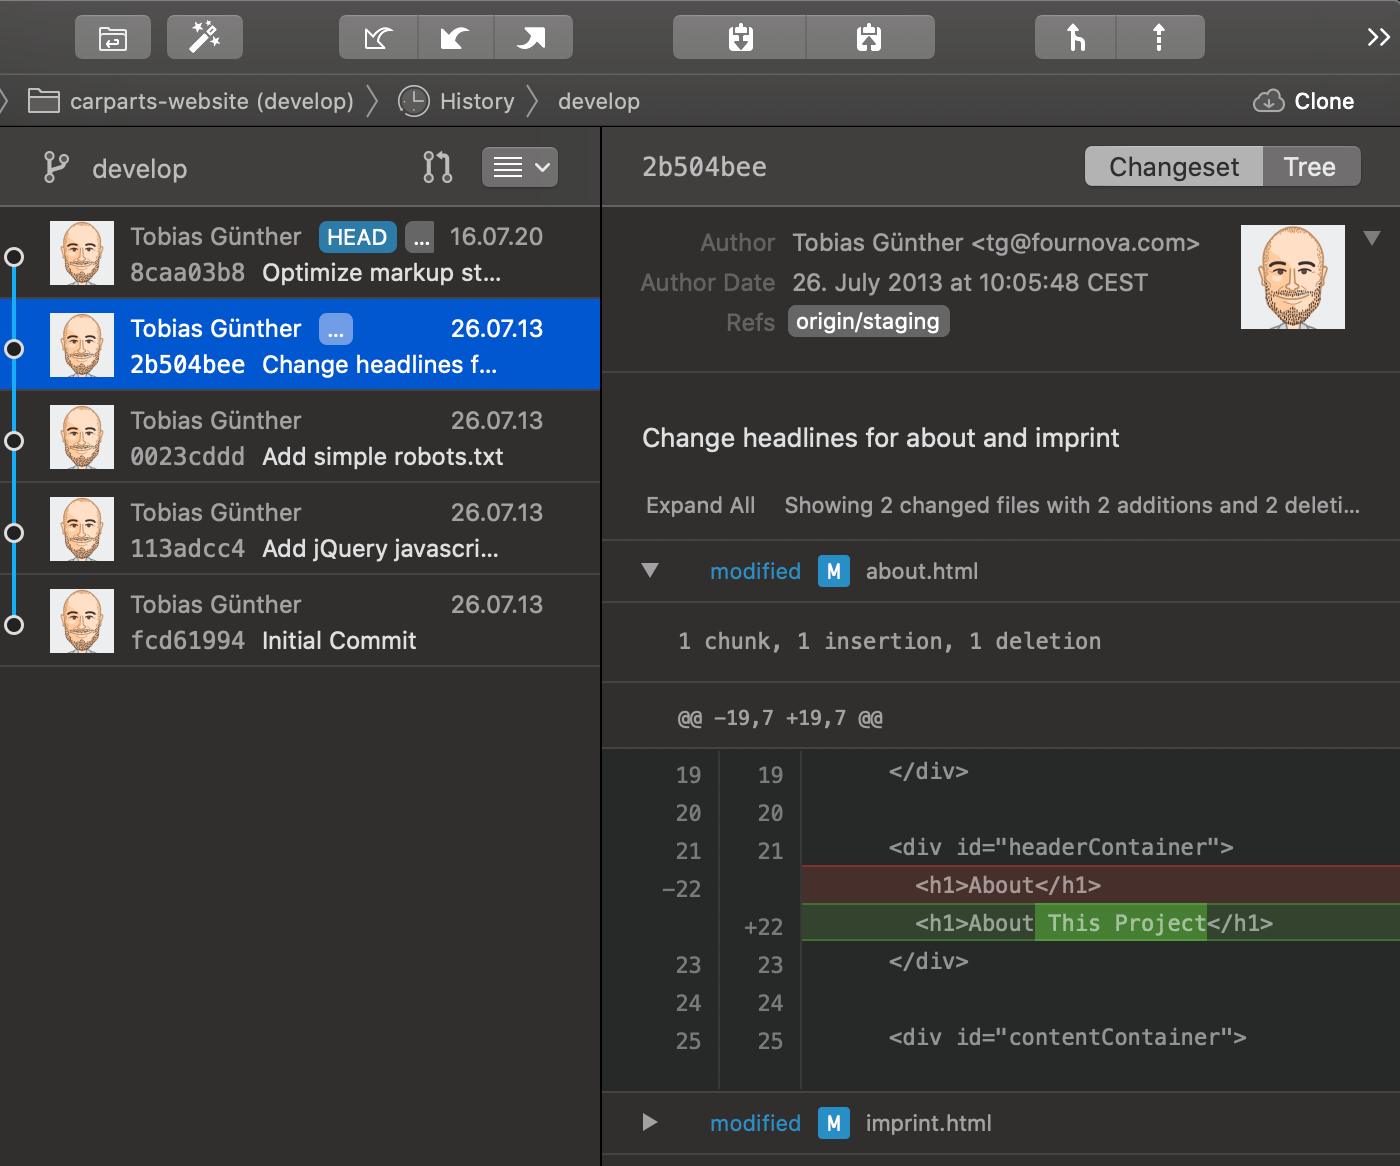
In case you are using the Tower Git client, its integrated Diff Viewer helps you understand changes quickly. You can not only see which lines were changed in a file, but - thanks to the inline highlighting feature - what exactly was changed:

Inspecting Local Changes
Earlier in the book, we often used the "git status" command to see which files were currently changed in our working copy. To understand how they were changed in detail, we can ask "git diff":
$ git diff
diff --git a/about.html b/about.html
index d09ab79..0c20c33 100644
--- a/about.html
+++ b/about.html
@@ -19,7 +19,7 @@
</div>
<div id="headerContainer">
- <h1>About</h1>
+ <h1>About This Project</h1>
</div>
<div id="contentContainer">
diff --git a/imprint.html b/imprint.html
index 1932d95..d34d56a 100644
--- a/imprint.html
+++ b/imprint.html
@@ -19,7 +19,7 @@
</div>
<div id="headerContainer">
- <h1>Imprint</h1>
+ <h1>Imprint / Disclaimer</h1>
</div>
<div id="contentContainer">
Without further options, "git diff" will show us all current local changes in our working copy that are unstaged.
If you want to see only changes that have already been added to the Staging Area, "git diff --staged" is your command of choice.
Inspecting Committed Changes
You already know that the "git log" command provides you with an overview of recent commits. If you want to see more than the standard metadata (hash, author, date, message), then you can add the "-p" flag to get the detailed "patches" of each commit.
Comparing Branches & Revisions
Finally, you might want to know how one branch (or even a specific revision) differs from another one. Let's see all the changes from the "contact-form" branch that we don't have in "master", yet:
$ git diff master..contact-formInstead of requesting such information on the branch level, you can even compare two arbitrary revisions with each other:
$ git diff 0023cdd..fcd6199Get our popular Git Cheat Sheet for free!
You'll find the most important commands on the front and helpful best practice tips on the back. Over 100,000 developers have downloaded it to make Git a little bit easier.

About Us
As the makers of Tower, the best Git client for Mac and Windows, we help over 100,000 users in companies like Apple, Google, Amazon, Twitter, and Ebay get the most out of Git.
Just like with Tower, our mission with this platform is to help people become better professionals.
That's why we provide our guides, videos, and cheat sheets (about version control with Git and lots of other topics) for free.