Integrating Fauna into Our Flask Application
Now let’s move on to integrating our CuriousCat clone with Fauna. The first thing we want to implement is user registration and authentication. We will start by importing the necessary libraries needed for Fauna to operate and merge with our existing code in our app.py file.
from flask import *
from flask_bootstrap import Bootstrap
from faunadb import query as q
from faunadb.objects import Ref
from faunadb.client import FaunaClient
app = Flask(__name__)
app.config["SECRET_KEY"] = "APP_SECRET_KEY"
Bootstrap(app)
client = FaunaClient(secret="your-secret-here")
Step 1: Integrating Fauna for User Authentication
Update the app.py file once again with the code below to add helper functions for encrypting user passwords before storing them into Fauna.
import pytz
import hashlib
from datetime import datetime
def encrypt_password(password):
return hashlib.sha512(password.encode()).hexdigest()
Next, update the login and register routes in the app.py file with the code below to get the registration and authentication logic up and running.
@app.route("/register/", methods=["GET", "POST"])
def register():
if request.method == "POST":
username = request.form.get("username").strip().lower()
password = request.form.get("password")
try:
user = client.query(
q.get(
q.match(q.index("users_index"), username)
)
)
flash("The account you are trying to create already exists!", "danger")
except:
user = client.query(
q.create(
q.collection("users"), {
"data": {
"username": username,
"password": encrypt_password(password),
"date": datetime.now(pytz.UTC)
}
}
)
)
flash(
"You have successfully created your account, you can proceed to login!", "success")
return redirect(url_for("register"))
return render_template("register.html")
@app.route("/login/", methods=["GET", "POST"])
def login():
if "user" in session:
return redirect(url_for("dashboard"))
if request.method == "POST":
username = request.form.get("username").strip().lower()
password = request.form.get("password")
try:
user = client.query(
q.get(
q.match(q.index("users_index"), username)
)
)
if encrypt_password(password) == user["data"]["password"]:
session["user"] = {
"id": user["ref"].id(),
"username": user["data"]["username"]
}
return redirect(url_for("dashboard"))
else:
raise Exception()
except:
flash(
"You have supplied invalid login credentials, please try again!", "danger")
return redirect(url_for("login"))
return render_template("login.html")
In the code above, we first made a query to our Fauna database to check if the user profile we are trying to create already exists using the index we created earlier. If it doesn’t exist, we proceed to save the user information in the database.
Step 2: Fueling Our User Dashboard with Fauna
Before we get our dashboard to render data from our Fauna database, we need to write a wrapper to ensure certain routes require authentication before they can be accessed. Add the code below to the app.py file:
from functools import wraps
def login_required(f):
@wraps(f)
def decorated(*args, **kwargs):
if "user" not in session:
return redirect(url_for("login"))
return f(*args, **kwargs)
return decorated
Next, we will be updating the dashboard route to render data from our Fauna dashboard and include the login_required wrapper.
@app.route("/dashboard/")
@login_required
def dashboard():
username = session["user"]["username"]
queries = [
q.count(
q.paginate(
q.match(q.index("questions_index"), True, username),
size=100_000
)
),
q.count(
q.paginate(
q.match(q.index("questions_index"), False, username),
size=100_000
)
)
]
answered_questions, unanswered_questions = client.query(queries)
return render_template("dashboard.html", answered_questions=answered_questions["data"][0], unanswered_questions=unanswered_questions["data"][0])
In the code above, we made a paginate query to our Fauna database along with a count query to get the number of answered and unanswered questions our user has. We will also be updating our dashboard.html file so jinja can render data being passed from our routes to the templates.
<div class="col-lg-4">
<div class="card text-center">
<h5 class="card-header">Total Questions Asked</h5>
<div class="card-body">
<h2 class="card-title">{{ answered_questions + unanswered_questions }}</h2>
<a href="{{ url_for('questions') }}" class="btn btn-success">See All Questions</a>
</div>
</div>
</div>
<div class="col-lg-4">
<div class="card text-center">
<h5 class="card-header">Total Answered Questions</h5>
<div class="card-body">
<h2 class="card-title">{{ answered_questions }}</h2>
<a href="{{ url_for('questions') }}?type=answered" class="btn btn-success">See Questions</a>
</div>
</div>
</div>
<div class="col-lg-4">
<div class="card text-center">
<h5 class="card-header">Total Unanswered Questions</h5>
<div class="card-body">
<h2 class="card-title">{{ unanswered_questions }}</h2>
<a href="{{ url_for('questions') }}?type=unanswered" class="btn btn-success">See Questions</a>
</div>
</div>
</div>
<div class="col-lg-8 mt-4">
<form class="text-center">
<div class="form-group">
<label>Profile Link</label>
<input type="text" id="profileLink" class="form-control" value="http://{{ request.host + url_for('view_profile', username=session.user.username) }}" readonly>
<small class="form-text text-muted">Share this link with friends so they can ask you questions</small>
</div>
<button type="button" class="btn btn-success mb-5" onclick="copyProfileLink()">Copy Profile Link</button>
</form>
</div>
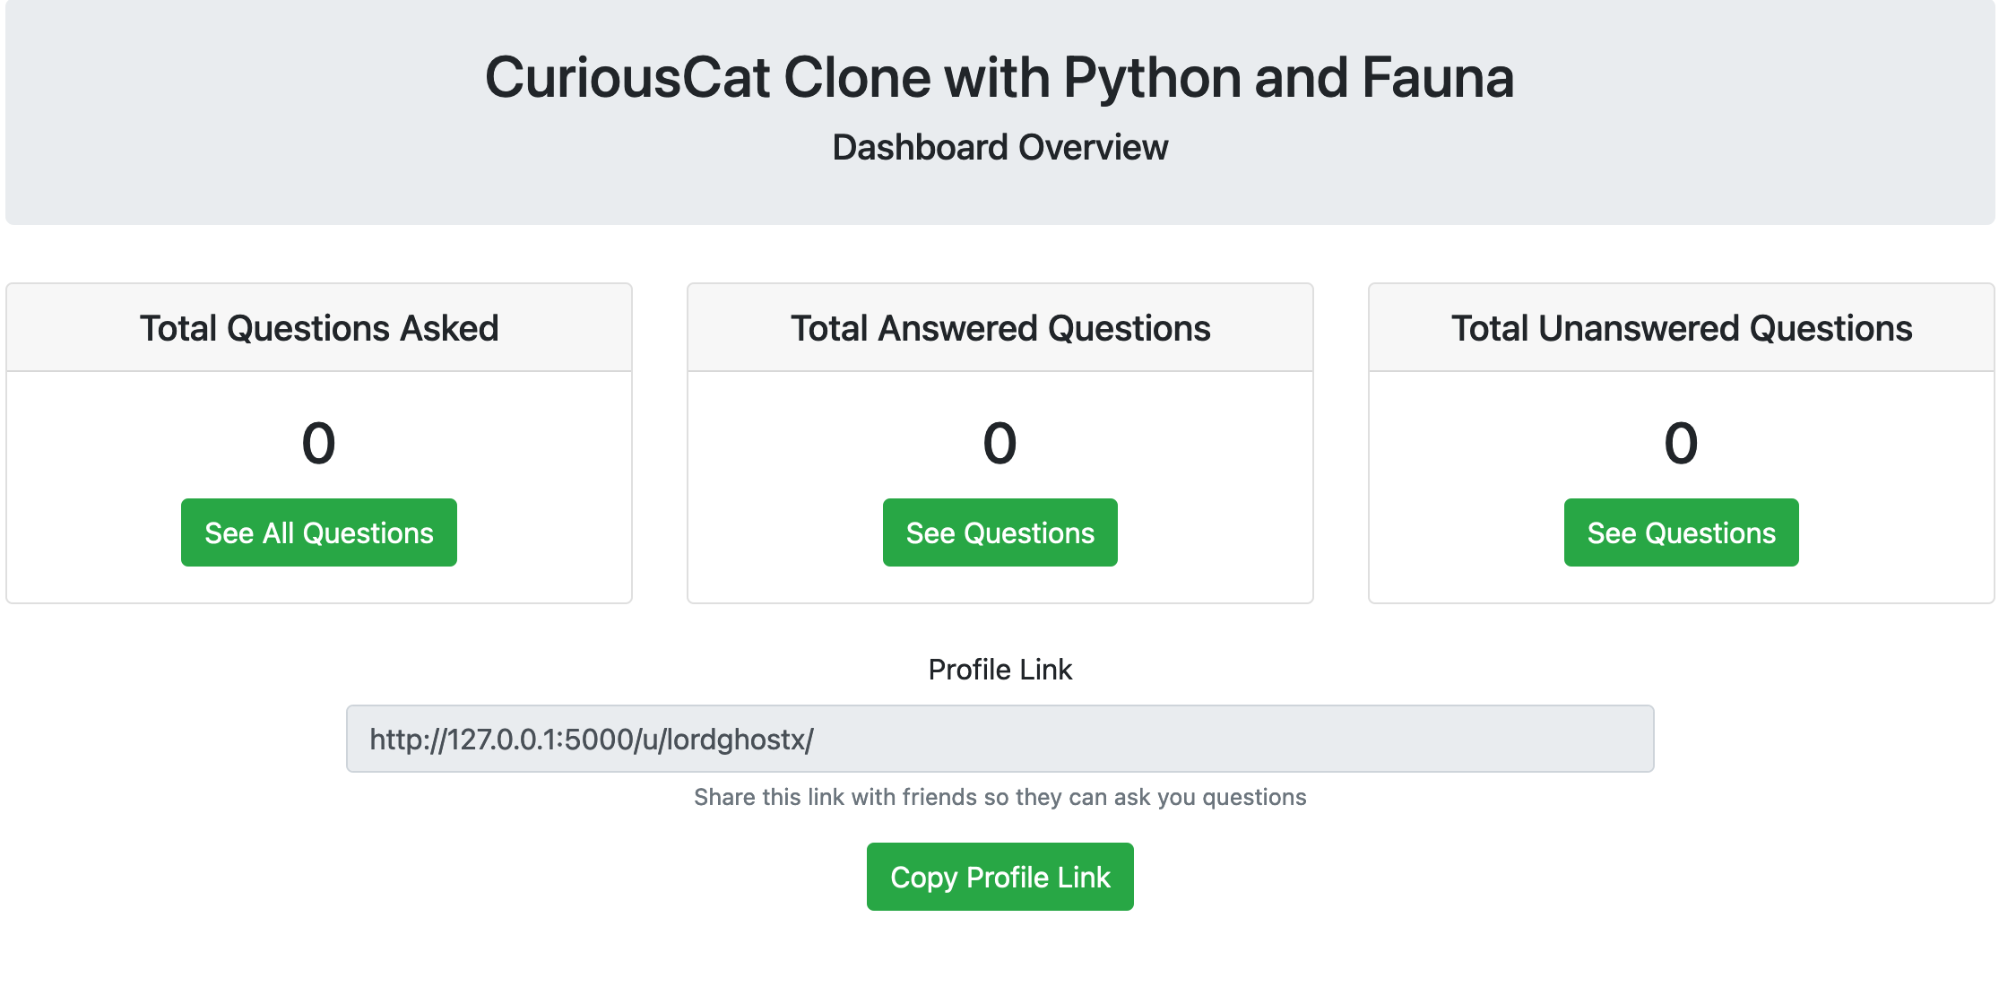
When we run our app.py file we should get a response close to the one in the image below, in our browser:

Step 3: Integrating Fauna into User Questions Page
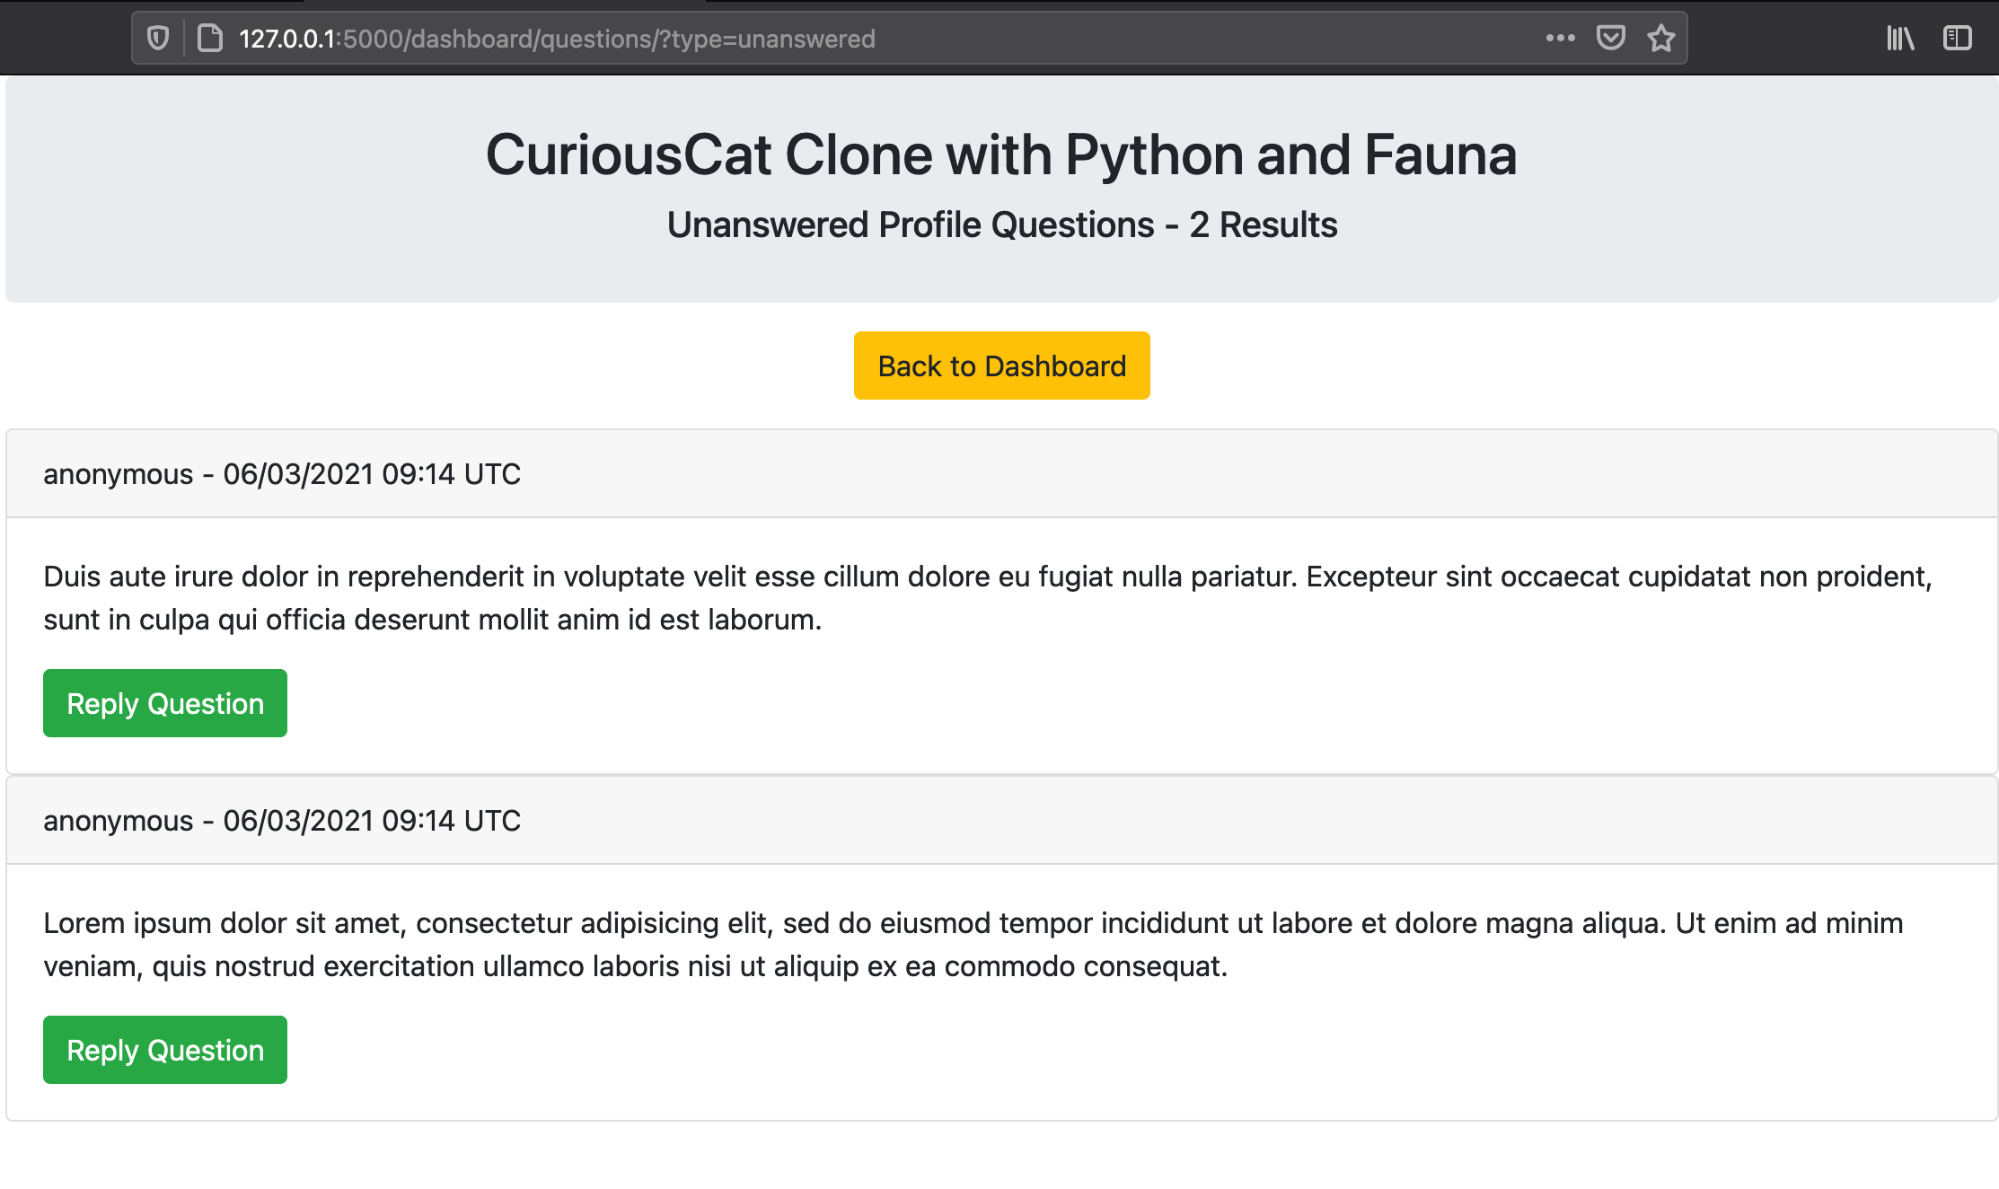
Update the questions route in our app.py file with the code below to query our Fauna dashboard for questions that the currently logged-in user has been asked on our platform so they can be rendered in their profile.
@app.route("/dashboard/questions/")
@login_required
def questions():
username = session["user"]["username"]
question_type = request.args.get("type", "all").lower()
if question_type == "answered":
question_indexes = client.query(
q.paginate(
q.match(q.index("questions_index"), True, username),
size=100_000
)
)
elif question_type == "unanswered":
question_indexes = client.query(
q.paginate(
q.match(q.index("questions_index"), False, username),
size=100_000
)
)
elif question_type == "all":
question_indexes = client.query(
q.paginate(
q.union(
q.match(q.index("questions_index"), True, username),
q.match(q.index("questions_index"), False, username)
),
size=100_000
)
)
else:
return redirect(url_for("questions"))
questions = [
q.get(
q.ref(q.collection("questions"), i.id())
) for i in question_indexes["data"]
]
return render_template("questions.html", questions=client.query(questions)[::-1])
Next, we will be updating our entire questions.html file with the code below to render the questions gotten from Fauna on our user dashboard.
{% extends "bootstrap/base.html" %}
{% block content %}
<div class="container">
<div class="row justify-content-center">
<div class="col-lg-12">
<div class="jumbotron text-center p-4" style="margin-bottom: 0px">
<h2>CuriousCat Clone with Python and Fauna</h2>
<h5>{{ request.args.get("type", "all")|capitalize }} Profile Questions - {{ questions|length }} Results</h5>
</div>
</div>
<a href="{{ url_for('dashboard') }}"><button type="button" class="btn btn-warning m-3">Back to Dashboard</button></a>
{% for i in questions %}
<div class="col-lg-12">
<div class="card">
<div class="card-header">
{{ i.data.user_asking }} - {{ i.data.date|faunatimefilter }}
</div>
<div class="card-body">
<p class="card-text">{{ i.data.question }}</p>
<a href="{{ url_for('reply_question', question_id=i.ref.id()) }}" class="btn btn-success">
{% if i.data.resolved %}
Edit Response
{% else %}
Reply Question
{% endif %}
</a>
</div>
</div>
</div>
{% endfor %}
</div>
</div>
{% endblock %}
Finally, we will create a custom jinja filter to format our dates while rendering them on the dashboard. Add the code below to your app.py file:
def faunatimefilter(faunatime):
return faunatime.to_datetime().strftime("%d/%m/%Y %H:%M UTC")
app.jinja_env.filters["faunatimefilter"] = faunatimefilter
Step 4: Integrating Fauna into Reply Questions Page
Update the reply_question route in our app.py file with the code below to query our Fauna dashboard for a specific question that our user was asked and build the functionality for questions to be responded to.
@app.route("/dashboard/questions/<string:question_id>/", methods=["GET", "POST"])
@login_required
def reply_question(question_id):
try:
question = client.query(
q.get(
q.ref(q.collection("questions"), question_id)
)
)
if question["data"]["user_asked"] != session["user"]["username"]:
raise Exception()
except:
abort(404)
if request.method == "POST":
client.query(
q.update(
q.ref(q.collection("questions"), question_id), {
"data": {
"answer": request.form.get("reply").strip(),
"resolved": True
}
}
)
)
flash("You have successfully responded to this question!", "success")
return redirect(url_for("reply_question", question_id=question_id))
return render_template("reply-question.html", question=question)
We will now be updating our form in the reply-question.html file with the code below to render the data of the question that was asked.
<div class="col-lg-8">
<form method="POST" class="text-center">
{% with messages = get_flashed_messages(with_categories=true) %}
{% if messages %}
{% for category, message in messages %}
<p class="text-{{ category }}">{{ message }}</p>
{% endfor %}
{% endif %}
{% endwith %}
<div class="form-group">
<label>Question asked by <strong>{{ question.data.user_asking }} at {{ question.data.date|faunatimefilter }}</strong></label>
<textarea class="form-control" rows="5" readonly>{{ question.data.question }}</textarea>
</div>
<div class="form-group">
<label>Your Reply</label>
<textarea class="form-control" rows="5" name="reply" placeholder="Enter reply to the question" required>{{ question.data.answer }}</textarea>
</div>
<button type="submit" class="btn btn-success">
{% if question.data.resolved %}
Edit Response
{% else %}
Reply Question
{% endif %}
</button>
<a href="{{ url_for('dashboard') }}"><button type="button" class="btn btn-warning">Back to Dashboard</button></a>
</form>
</div>
Step 5: Fueling Our User Profile Page with Fauna
Update the view_profile route in our app.py file with the code below to view user profiles and render questions they have responded to on our platform.
@app.route("/u/<string:username>/")
def view_profile(username):
try:
user = client.query(
q.get(
q.match(q.index("users_index"), username)
)
)
except:
abort(404)
question_indexes = client.query(
q.paginate(
q.match(q.index("questions_index"), True, username),
size=100_000
)
)
questions = [
q.get(
q.ref(q.collection("questions"), i.id())
) for i in question_indexes["data"]
]
return render_template("view-profile.html", username=username, questions=client.query(questions)[::-1])
We will also be updating our view-profile.html file so jinja can render the data coming from our Fauna dashboard.
{% extends "bootstrap/base.html" %}
{% block content %}
<div class="container">
<div class="row justify-content-center">
<div class="col-lg-12">
<div class="jumbotron text-center p-4" style="margin-bottom: 0px">
<h2>CuriousCat Clone with Python and Fauna</h2>
<h5>{{ username }} Profile Questions - {{ questions|length }} Results</h5>
</div>
</div>
<a href="{{ url_for('ask_question', username=username) }}"><button type="button" class="btn btn-warning m-3">Ask {{ username }} a question</button></a>
{% for i in questions %}
<div class="col-lg-12">
<div class="card">
<div class="card-header">
{{ i.data.user_asking }} - {{ i.data.date|faunatimefilter }}
</div>
<div class="card-body">
<p class="card-text">{{ i.data.question }}</p>
<a href="{{ url_for('view_question', question_id=i.ref.id()) }}" class="btn btn-success">View Response</a>
</div>
</div>
</div>
{% endfor %}
</div>
</div>
{% endblock %}
Step 6: Integrating Fauna into Our Ask Question Page
Update the ask_question route in our app.py file with the code below to provide visitors a page where they can ask our platform users questions.
@app.route("/u/<string:username>/ask/", methods=["GET", "POST"])
def ask_question(username):
try:
user = client.query(
q.get(
q.match(q.index("users_index"), username)
)
)
except:
abort(404)
if request.method == "POST":
user_asking = request.form.get("user_asking", "").strip().lower()
question_text = request.form.get("question").strip()
question = client.query(
q.create(
q.collection("questions"), {
"data": {
"resolved": False,
"user_asked": username,
"question": question_text,
"user_asking": "anonymous" if user_asking == "" else user_asking,
"answer": "",
"date": datetime.now(pytz.UTC)
}
}
)
)
flash(f"You have successfully asked {username} a question!", "success")
return redirect(url_for("ask_question", username=username))
return render_template("ask-question.html", username=username)
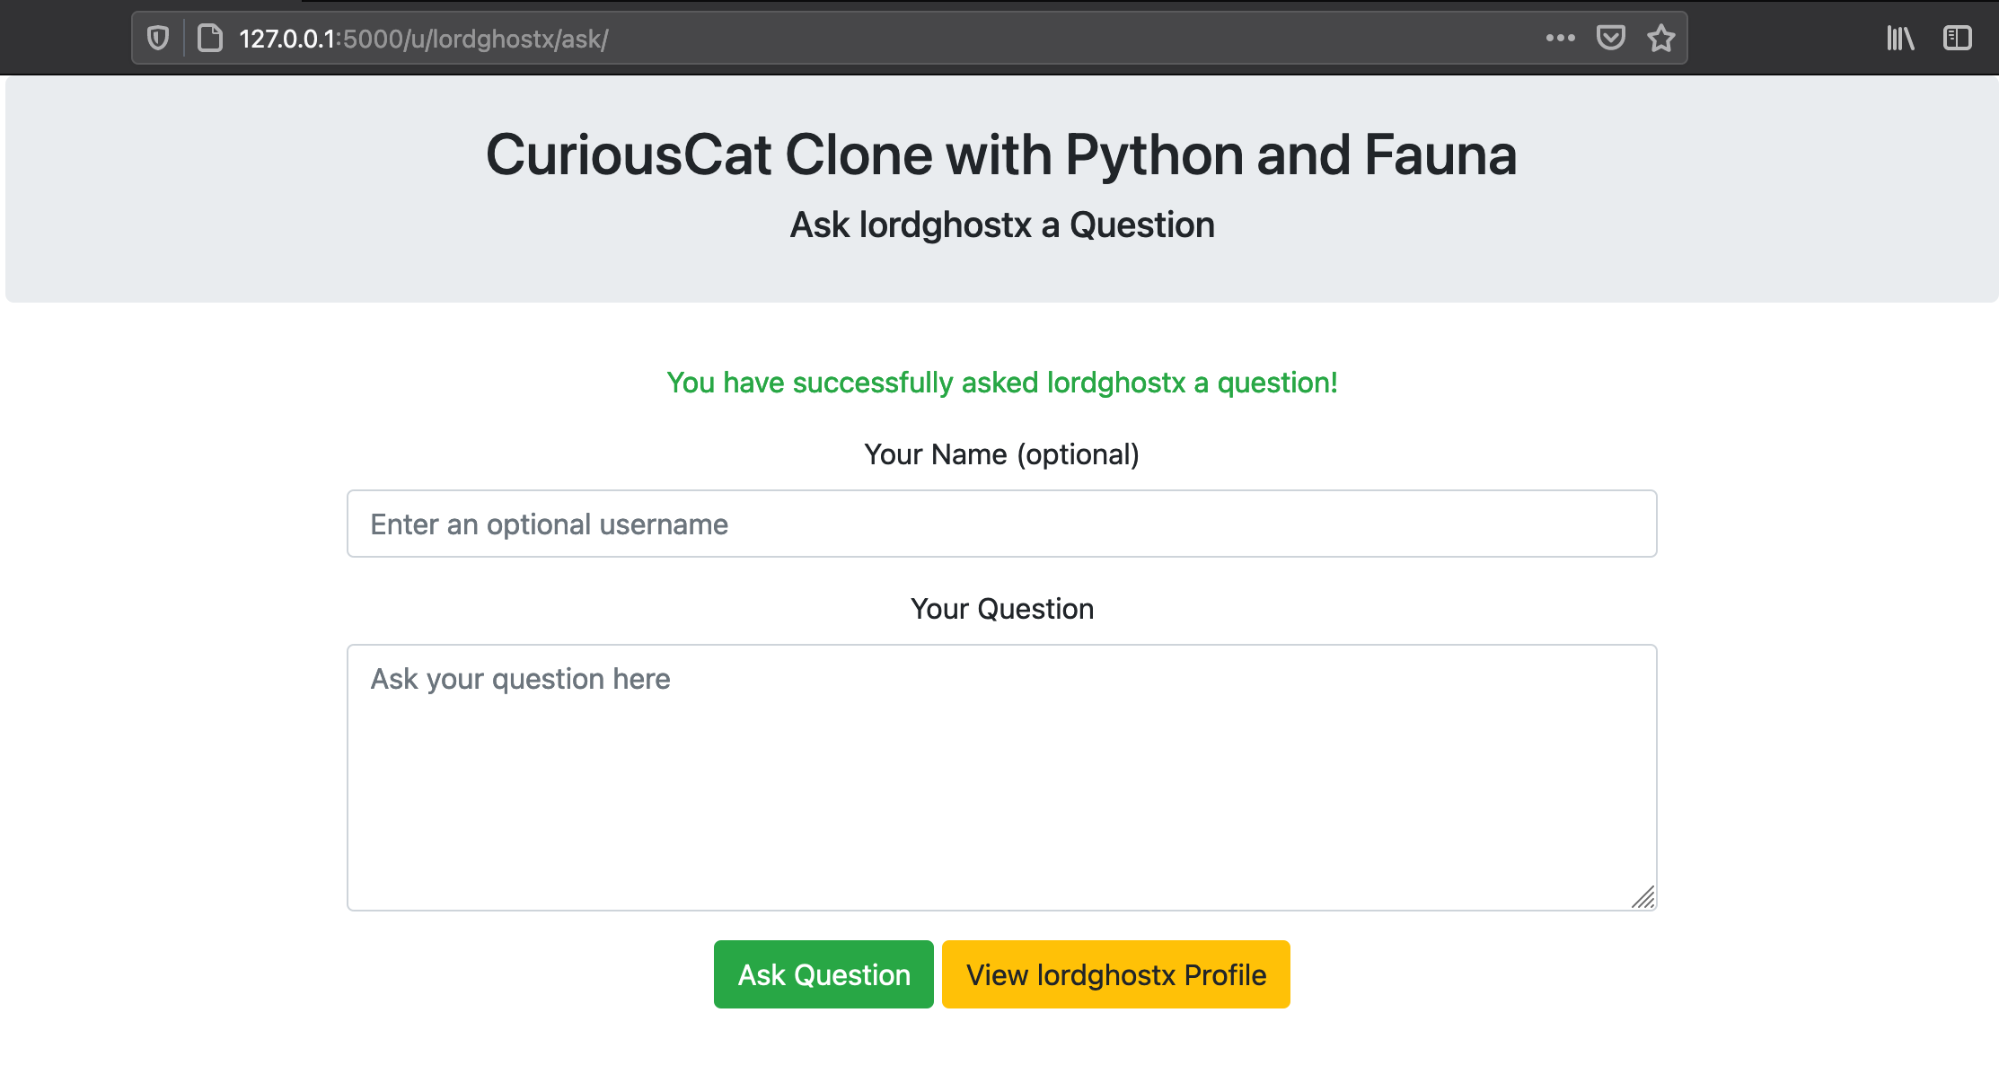
I will be filling the form a couple of times to populate our database so we have sample question data to work with.


Step 7: Integrating Fauna into Our View Question Page
Update the view_question route in our app.py file with the code below to provide visitors a page where they can view the responses to questions that were asked on our platform.
@app.route("/q/<string:question_id>/")
def view_question(question_id):
try:
question = client.query(
q.get(
q.ref(q.collection("questions"), question_id)
)
)
except:
abort(404)
return render_template("view-question.html", question=question)
We will also be updating our view-question.html file so jinja can render the data coming from our Fauna dashboard.
{% extends "bootstrap/base.html" %}
{% block content %}
<div class="container">
<div class="row justify-content-center">
<div class="col-lg-12">
<div class="jumbotron text-center p-4">
<h2>CuriousCat Clone with Python and Fauna</h2>
<h5>Viewing Question for {{ question.data.user_asked }}</h5>
</div>
</div>
<div class="col-lg-8">
<form class="text-center">
<div class="form-group">
<label>Question asked by <strong>{{ question.data.user_asking }} at {{ question.data.date|faunatimefilter }}</strong></label>
<textarea class="form-control" rows="5" readonly>{{ question.data.question }}</textarea>
</div>
<div class="form-group">
<label>{{ question.data.user_asked }} Response</label>
<textarea class="form-control" rows="5" readonly>{{ question.data.answer }}</textarea>
</div>
<a href="{{ url_for('view_profile', username=question.data.user_asked) }}"><button type="button" class="btn btn-success">Back to {{ question.data.user_asked }} Profile</button></a>
</form>
</div>
</div>
</div>
{% endblock %}
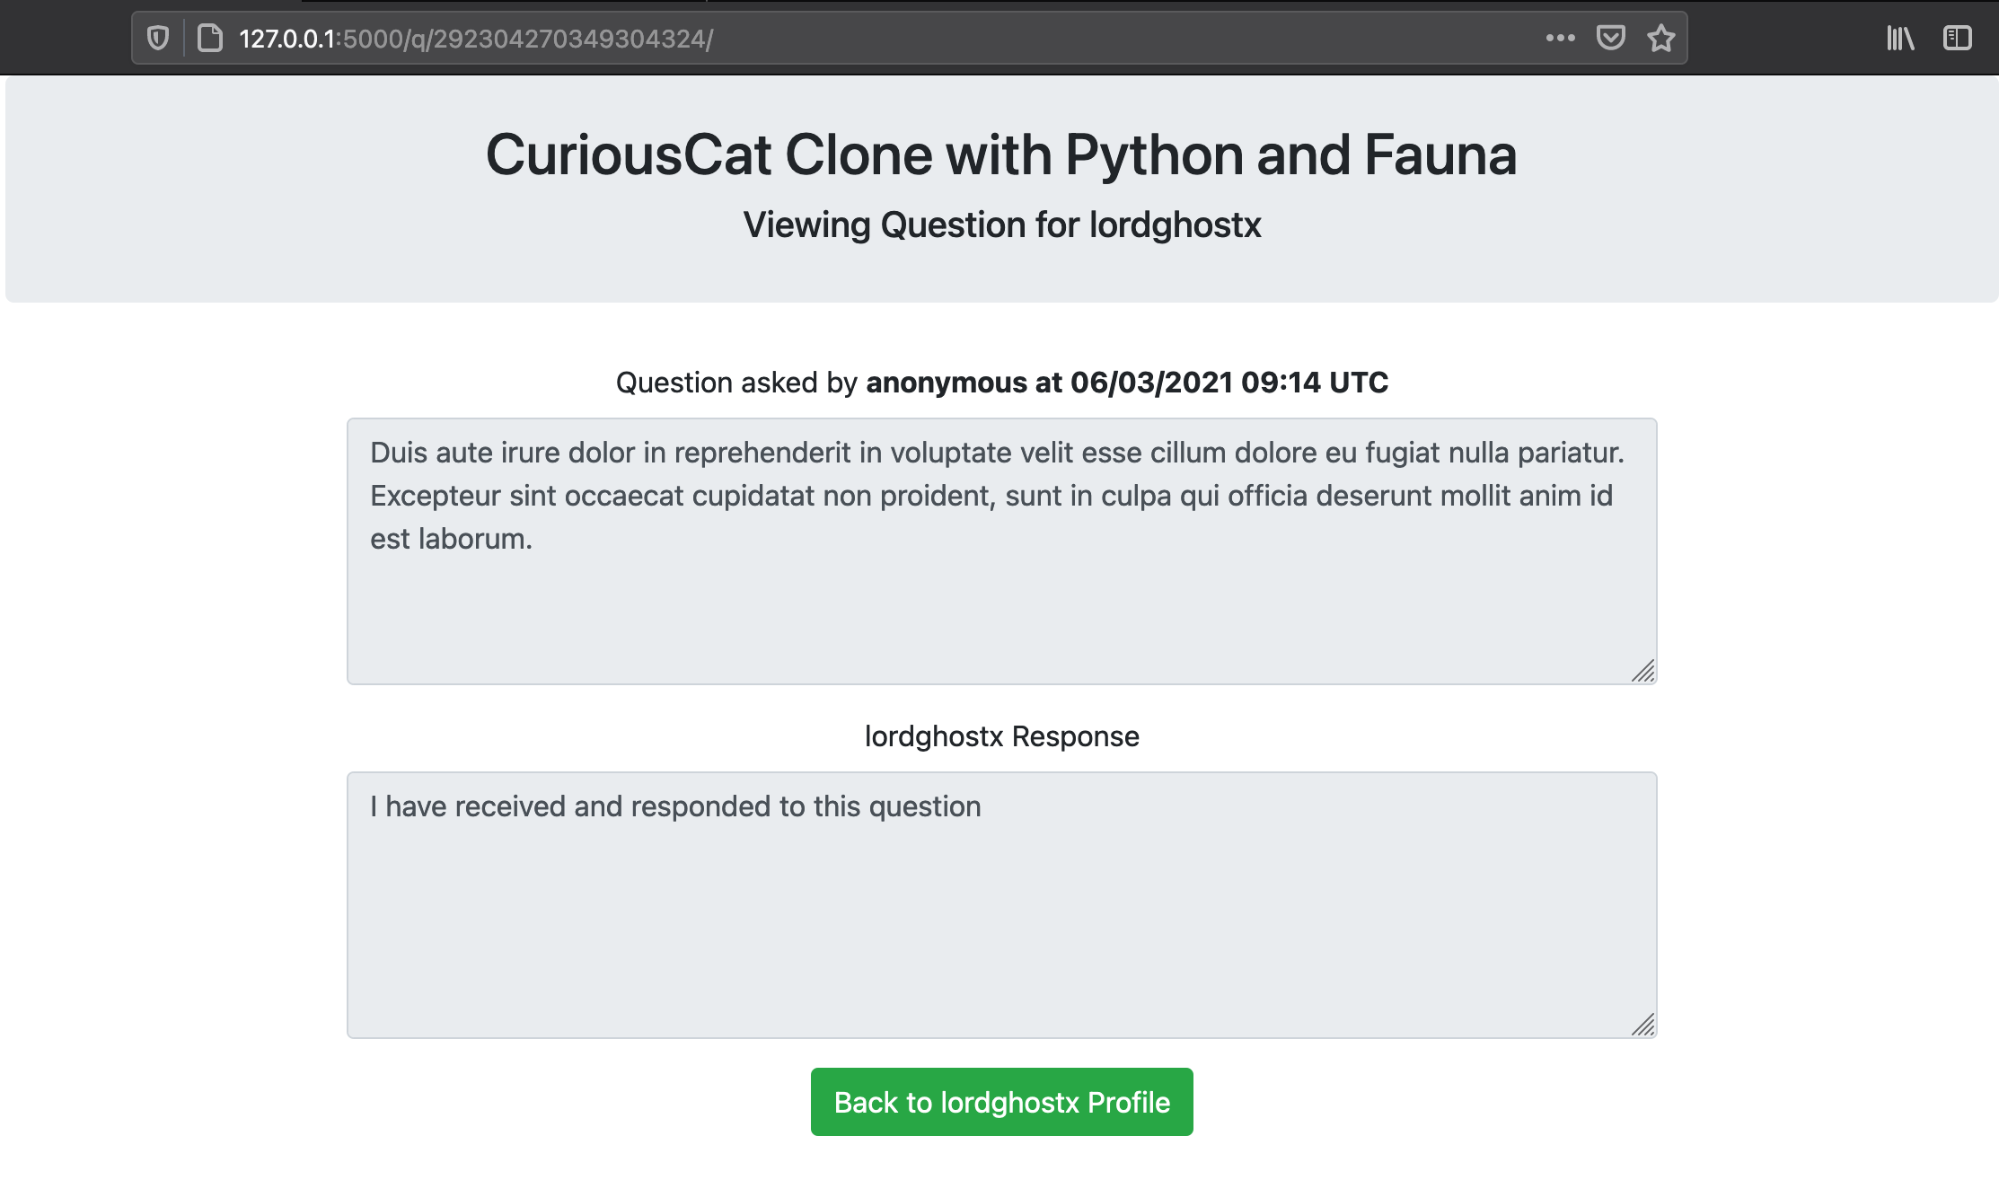
When we run our app.py file and view a responded question from our user profile, we should get a response quite like the image below in our browser:

Conclusion
In this article, we built a functional clone of the CuriousCat web application with Fauna's serverless database and Python. We saw how easy it was to integrate Fauna into a Python application and got the chance to explore some of its core features and functionalities.
If you have any questions, don't hesitate to contact the author on Twitter: @LordGhostX
Code on GitHub
The source code of our CuriousCat clone is available on GitHub.
