In "10% More Productive", we will share tips on how to become more competent and efficient with the tools we use daily. What better way to kickstart this new series than by focusing on the keyboard, the developer's most trusty friend?
New Series: "10% More Productive"
This is part 1 of our series titled "10% More Productive". Be sure to check out our tips on:
- Mastering the Keyboard ← you are here!
- Mastering Sublime Text
- Mastering the Terminal
- Mastering Tower for Mac
- Mastering Google (for Developers)
- Mastering macOS
- Mastering SEO for Developers
- Mastering Tower for Windows
Sign up for our newsletter to get notified about the next episode!
Keyboards have been around since the 1970s and have become the main input method for computers ever since. They come in all shapes and sizes, and many developers are constantly on the lookout for the perfect device.
To follow this article, absolutely any keyboard will do. We will discuss keyboard shortcuts (and how to learn new ones), how to set up a Hyper Key, and how to boost your productivity whenever your hands are sitting on a keyboard.
We will start with a short warm-up and slowly proceed towards full keyboard mastery.
Ready? Let's start!
1. Avoiding Temptation to Reach the Mouse
Here is a simple example: let us assume you have both hands sitting on the keyboard, and you decide to create a "New Document". Which approach is faster?
- Taking your hand off the keyboard;
- Placing your hand on the mouse;
- Mousing over to the "File" menu;
- Clicking "File";
- Clicking "New";
- Taking your hand off the mouse;
- Placing your hand back on the keyboard.
Or simply pressing ⌘ + N?
The answer seems obvious. True keyboard mastery starts with leaving the mouse alone. That is not to say that the mouse is not an important device — both peripherals are equally indispensable in our day-to-day life. Relying on just the keyboard would be far from ideal for performing certain tasks, such as image editing or simply browsing the web.
It is paramount to accept the idea that sometimes it will take longer to get things done, simply because you do not remember (or know) the necessary keystrokes. To improve, you will need to take a step back and retrain your mental muscle memory.
Leaving the comfort zone can be hard, but it will pay off eventually. You'll slowly get better at deciding which device will help you accomplish each task quicker, which is the main goal of this first exercise.
2. Mastering Universal Keyboard Shortcuts
When it comes to learning keyboard shortcuts, I would suggest you start by becoming familiar with Universal keyboard shortcuts — those shortcuts that you can use across pretty much every application or that are reserved by the Operating System.
Here are some examples of noteworthy shortcuts on the Mac. They will also work on Windows if you replace ⌘ with ctrl. This list assumes you have your operating system and software set to English:
- ⌘ + N - Create New
- ⌘ + O - Open
- ⌘ + S - Save
- ⌘ + P - Print
- ⌘ + A - Select All
- ⌘ + X - Cut
- ⌘ + C - Copy
- ⌘ + V - Paste
- ⌘ + Z - Undo
- ⌘ + Y - Redo
You probably knew some of these already. There are also some other essential shortcuts to keep an eye on, but they are specific to each operating system.
Here are some examples for macOS:
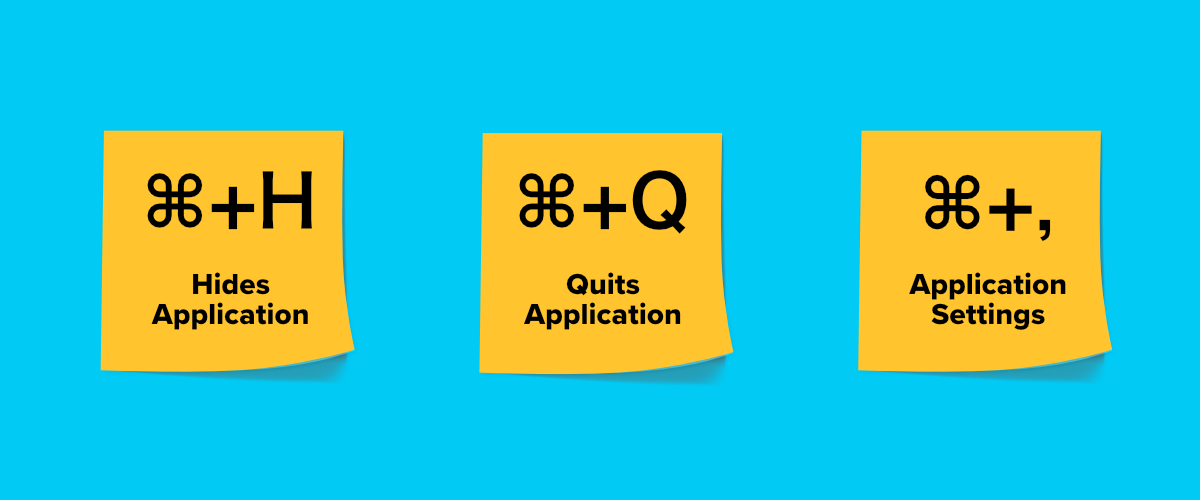
- ⌘ + Q - Quits Application
- ⌘ + H - Hides Application
- ⌘ + , - Application Settings
- ⌘ + TAB - Switches Applications
And for Windows:
- ALT + F4 - Closes Application
- ALT + F - Opens the "File" menu
- ALT + TAB - Switches Applications
These are some of the most frequently used keystrokes, but there are many more to master. You can have a look at this page for macOS shortcuts and this one for Windows.
Working with Text
Developers are expected to spend a lot of time editing text, so it makes sense to learn some specific keystrokes for text insertion, selection, and deletion.
These shortcuts should work across most text editors. If you're on Windows, replace ⌘ with CTRL and ⌥ with ALT:
- ⌘ + BACKSPACE will delete the entire line;
- ⌥ + BACKSPACE will delete the word up to where the cursor is located;
- ⌘ + ↑ travels to the beginning of the document;
- ⌘ + ↓ travels to the end of the document;
- ⌘ + ← / ⌘ + → travels to the beginning/end of the line;
- ⌥ + ← / ⌥ + → travels to the beginning/end of the word.
Here are two more useful keyboard shortcuts that slightly differ on each operating system:
⇧ + ⌘ + ⌥ + V will usually paste whatever you have in your clipboard without any special formatting. This is a bit simpler on Windows: Ctrl + Shift + V.
⌃ + ⌘ + SPACE will open the Emoji panel. In Windows 10, you can hold the WINDOWS key and press either the period (.) or semicolon (;) until the emoji picker appears.
Let's look at some application-specific shortcuts now.
Not a Tower user yet?
Download our 30-day free trial and experience a better way to work with Git!
3. Identifying Keyboard Shortcuts You Can Use in Your Favorite Apps
We will address some important keyboard shortcuts for the most popular apps in future episodes of the "10% More Productive" series, but if you are eager to start, you should have a look at the following:
- The "Help" section of each app, as most include a list of keyboard shortcuts in the documentation.
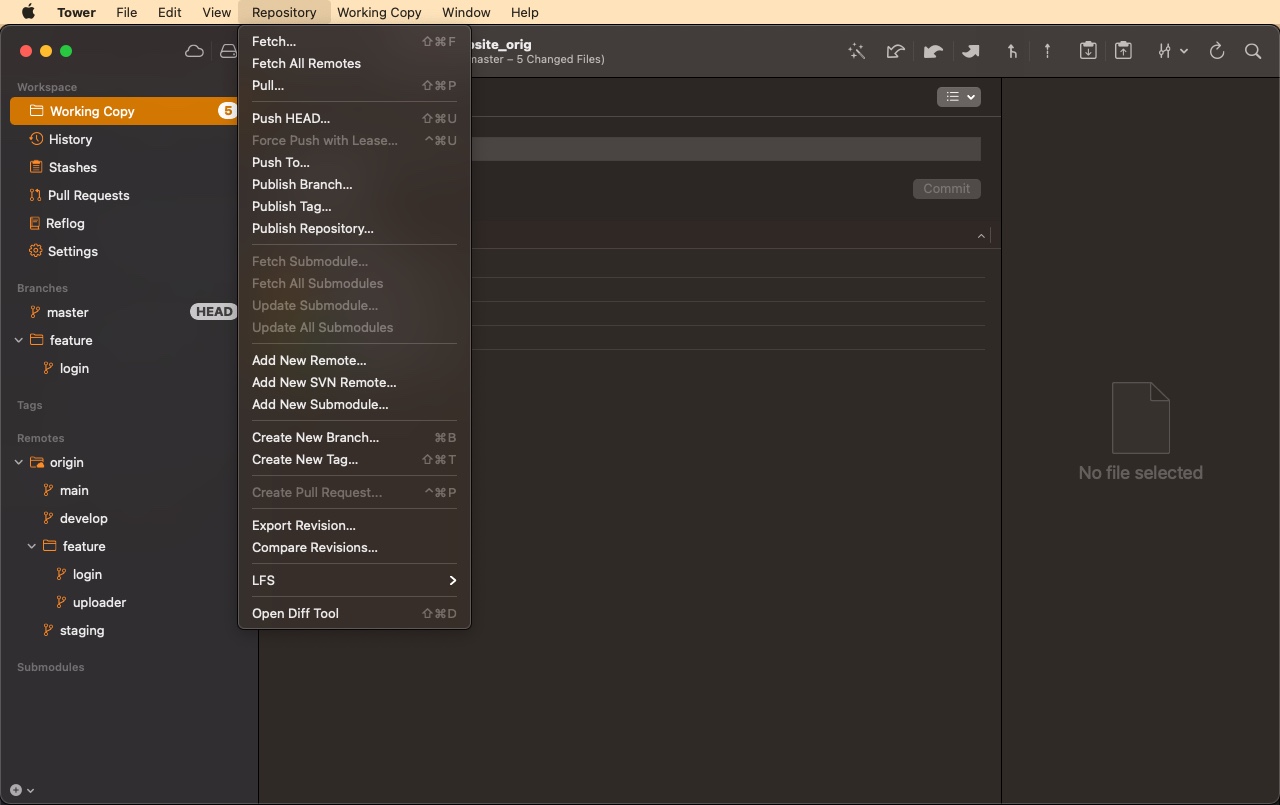
- The menu of each app, since available keyboard shortcuts will be displayed next to the action. As an example, you can find Tower's menu below.

Cheat Sheets
Some applications provide cheat sheets that you can print, so make sure you visit their websites — here is our very own Tower cheat sheet. If your other favorite applications do not provide one, you can also search for community-made cheat sheets.
If you're on the Mac, you can also install Cheatsheet, a program that quickly lists every shortcut available for the application you're currently using.
For many popular Web Applications, you can display a list of available shortcuts by pressing ?. Give it a try! Just keep in mind that this may not work on all browsers.
4. Forcing Yourself to Learn New Shortcuts
Now that you have an entire list of new keyboard shortcuts at your disposal, it's time for some practice. You will need to work on your muscle memory and have some patience. Start with the ones that you feel will be used more frequently.
Sticky notes may help you in this process. You can leave some of them on your desk with a list of shortcuts that you would like to memorize during that week — 5 keyboard shortcuts per week would be a good starting point.

If you don't mind messing around with your keyboard, you can also create or buy a set of keyboard stickers. This is common practice among audio/video software users. I have never tried this solution, but it may work wonders for you, especially if you spend a considerable amount of time on a single application.
5. Setting Up a Hyper Key
In case you don't know already, the Hyper Key combines all the standard modifiers ⌃ + ⌥ + ⌘ + ⇧. Why is this useful? Because you can come up with new keyboard combinations that aren’t already assigned to the operating system or to an application.
Most people remap the Caps Lock key, as it's rarely used (unless you're a fan of shouting!). I remapped mine two years ago and I have never looked back.
If you are on the Mac, you can easily customize your keyboard with one of these applications:
I use a combination of two of the above: I remap the Caps Lock key with Karabiner Elements and then assign some creative workflows with the help of BetterTouchTool.
As an example, I launch many of my favorite apps with the Hyper Key, like this:
- ⌃⌥⌘⇧ + S - Launches Safari
- ⌃⌥⌘⇧ + G - Launches Tower
- ⌃⌥⌘⇧ + T - Launches iTerm 2
- ⌃⌥⌘⇧ + C - Launches VS Code
- ⌃⌥⌘⇧ + E - Launches Sublime Text
- ⌃⌥⌘⇧ + F - Launches Firefox Developer Edition
I have also created some custom shortcuts and more complex workflows, which I will share in the next section!
6. Creating Your Own Shortcuts and Workflows
Now that you're comfortable with the keyboard, it's time to take it to the next level. Let's start by creating custom shortcuts.
On most apps, you may have noticed that some actions on the menu don't have a shortcut key assigned to them. Luckily for us, there's an easy way to fix that on macOS.
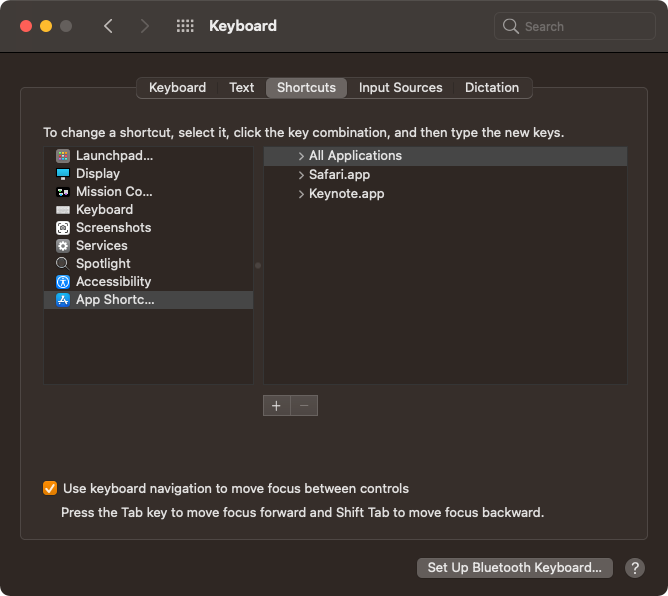
Visit the "Keyboard" panel under "System Preferences". Go to the "Shortcuts" tab, choose "App Shortcuts" and click the "+" symbol.

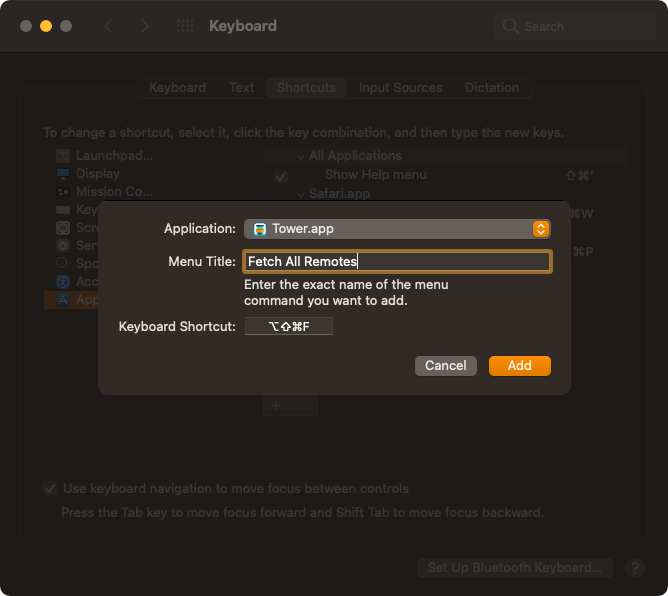
Next, pick what app should listen for this shortcut and assign the intended keystroke. On the "Menu Title" field, make sure you type the exact name of the command — it will not work otherwise!
As an example, let's add the possibility to "Fetch All Remotes" in Tower:

If you succeed, you will notice the new shortcut on the menu:

You can also use this technique to replace existing shortcuts, but I suggest that you first look at the "Preferences" panel of each of your favorite apps and see if you can assign a different hotkey to an action. Many apps allow this.
You may also be wondering if you can import keymappings from your favorite text editor to a different one. This is a great idea if you want to give a new text editor a try (have a look at some of our suggestions) and if you're looking for a consistent experience across multiple editors. This is possible with the help of packages/plugins; a Google search should suffice.
Finally, you may want to trigger a specific set of actions when you press a certain combination of keys. Have a look at AutoHotkey for Windows or BetterTouchTool and Keyboard Maestro for the Mac.
With these applications, it's totally up to your imagination and needs. Sometimes, coming up with workflow ideas is the hard part. So, here are some ideas:
- Automatically open all your browsers for testing purposes.
- Automatically open all your Web Development tools (e.g., VS Code, Google Chrome, and Tower).
- Prepare your computer for screencasting by hiding all windows, opening a program at a specific image size, and starting your screen recording software.
I recommend that you have a look at each application's forums to learn different ways to take advantage of these superpowers. Many users enjoy sharing their workflows, and you will definitely find some inspiration for your own specific needs.
7. Using Text Snippets to Speed Up Typing
Text Snippets, sometimes known as Text Expanders, can quickly replace a short keyword with a longer text block. This is an effective way to speed up tedious tasks.
An example would be to fill out forms, which is probably something you do every day. Here are some suggestions:
- _name to insert your full name;
- _email to insert your email address;
- _address to insert your full address;
- _phone to insert your telephone number;
- _bank to insert your bank account number.
I use many other snippets while writing emails, blog posts, or filling out forms, as demonstrated above.
You can, of course, create your own text snippets to use while coding. Most text editors already have a set of built-in snippets for a number of languages, and there are many plugins created by the community that take this further, but you can simply come up with your own for the text blocks you see yourself typing again and again.
Most text editors allow you to easily create a new snippet, so here is how you can accomplish this with VS Code and Sublime Text.
While this is a good solution, I prefer something I can use system-wide. That way:
- my snippets are always available;
- my snippets are stored independently from the text editor I'm using.
There are many suitable applications for this task. Have a look at aText, which works on both Windows and macOS.
Final Words
If you are reading this, congratulations! You are almost a keyboard master. But the learning never stops.
There are always new ways to increase productivity, so I advise you to remain curious and open to trying new things. Sometimes, the only way to move forward is to take a step back. This would be my parting advice.
I hope you found this article useful and learned a thing or two. I will be back soon with another episode of "10% More Productive" — in the meantime, keep practicing!
Join Over 100,000 Developers & Designers
Be the first to know about new content from the Tower blog as well as giveaways and freebies via email.

