Following the success of our Mastering Tower for Mac guide, it's time to give Tower for Windows some love! In this page, we will show you how to get the most out of your favorite Git client. From navigation tips to workflow hacks, you'll find everything you need right here! 🔥
Fasten your seatbelt and prepare to boost your productivity while working with Tower! Whether you're a seasoned user or just starting out, we’re confident that this guide will introduce you to many tips and tricks that you may not yet be aware of.
Let’s dive right in!
1. Navigation Tips
Like any tool designed for productivity, Tower offers a variety of keyboard shortcuts (and we all love keeping our hands on the keyboard, don’t we?).
By remembering a few key shortcuts, you can navigate between projects and views much more quickly. Let's have a look at the most important ones!
BTW: for your convenience, you can download our Tower Cheat Sheet, available for both Windows and Mac.

Quick Open
To quickly access any repository, press CTRL + O to open Tower's "Quick Open" window.
When the input field is empty, the repositories will be organized based on the last date they were accessed. Just begin typing to locate the project you want.
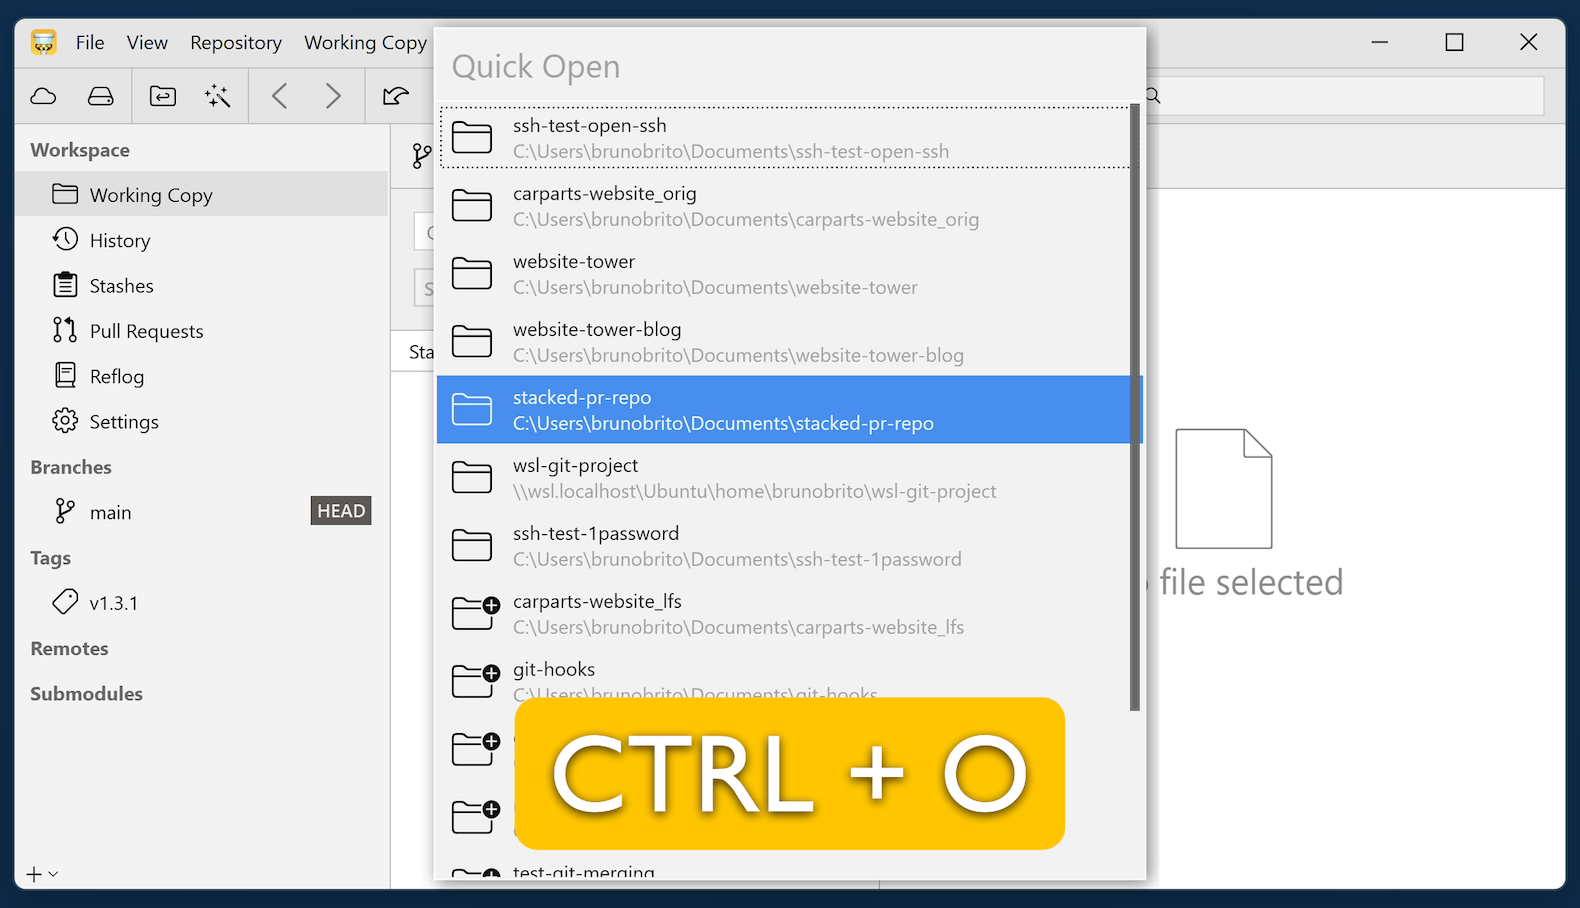
Tower regularly scans your local disks for available Git repositories, including those you haven’t opened before. This is the default setting, but you can disable it by going to the "General" tab in the "Preferences" window.
Switching Between Views Using Keyboard Shortcuts
Once you've opened a project, you can swiftly switch to a different view using the following keyboard shortcuts:
- Press CTRL + 1 to access the "Working Copy" view.
- Press CTRL + 2 to access the "History" view.
- Press CTRL + 3 to access the "Stashes" view.
- Press CTRL + 4 to access the "Pull Request" view.
- Press CTRL + 5 to access the "Reflog" view (this shortcut works even if the "Show Reflog in sidebar" option is disabled in the Preferences).
You can press CTRL + 0 to navigate to the HEAD branch.
Additionally, you can easily switch between the "Services" and "Repositories" views by pressing ALT + S and ALT + R.
Quick Actions
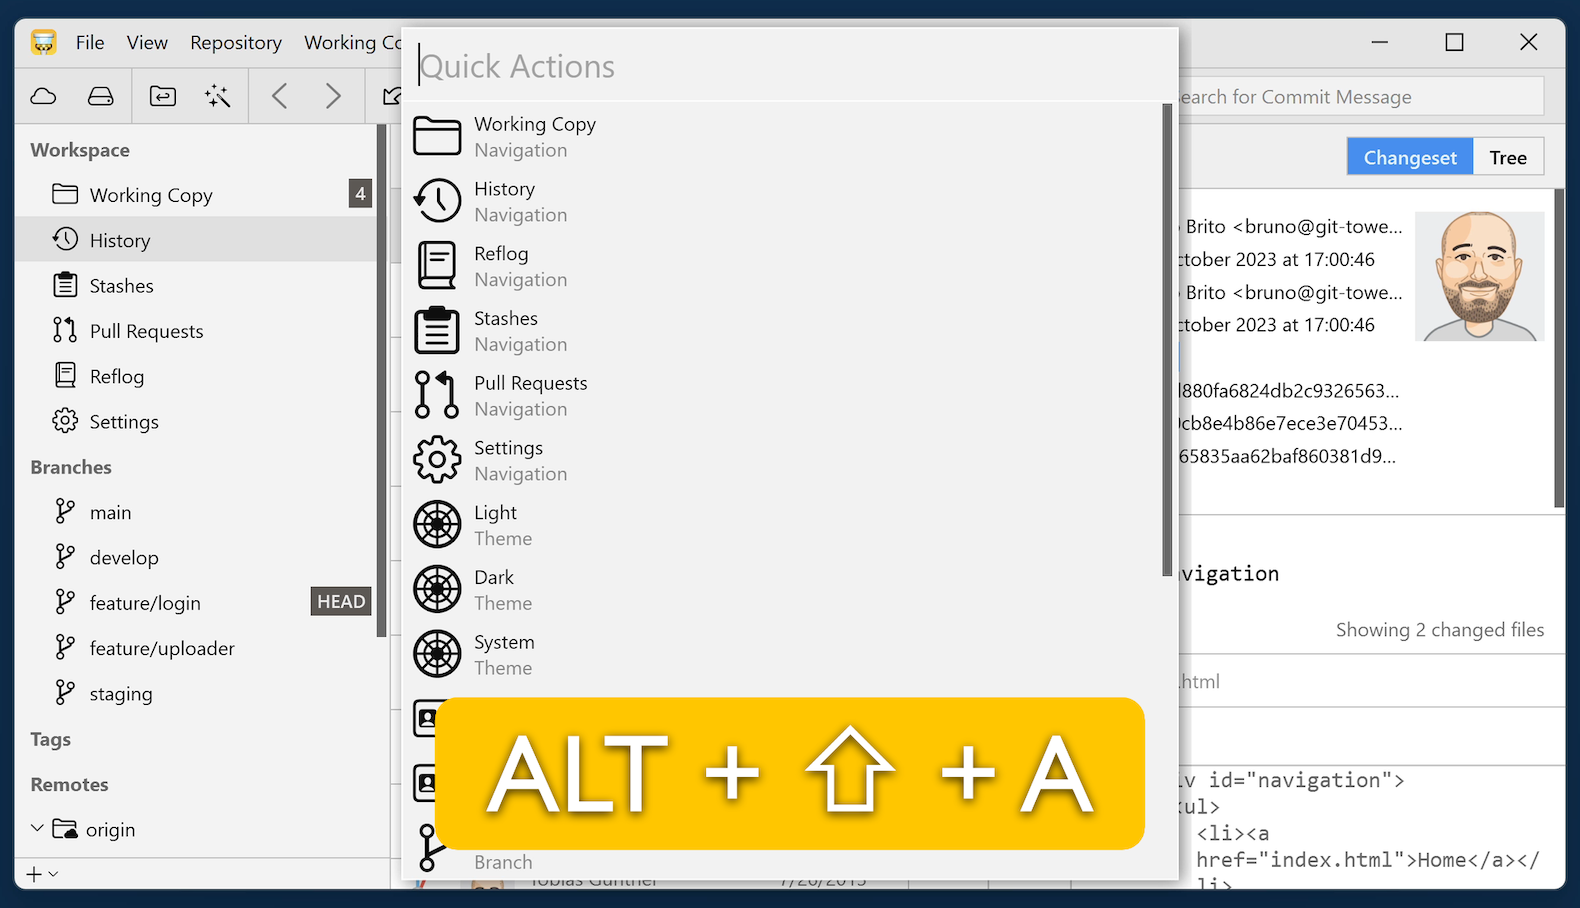
"Quick Actions" is Tower's version of the Command Palette. It’s so powerful that we've dedicated an entire blog post to it!
Within a project, simply press ALT + ⇧ + A to launch Quick Actions and begin typing; the suggested actions will be based on the context.
Here are some powerful actions you can perform:
- Look for a file.
- Change themes.
- Check out branches or tags.
- Configure a different Committer Identity.
2. Staging and Committing Tips
To stage the currently selected file, press the SPACEBAR. To stage all recent changes, use CTRL + ⇧ + A (you can reverse this action with ALT + CTRL + ⇧ + A). To discard all local changes, CTRL + ⇧ + ⌫ is your friend.
In the "Working Copy" view, press CTRL + ⇧ + C to quickly bring up the commit dialog. Need assistance in crafting a better commit message? Tower is here to help!
You can use the following shortcuts:
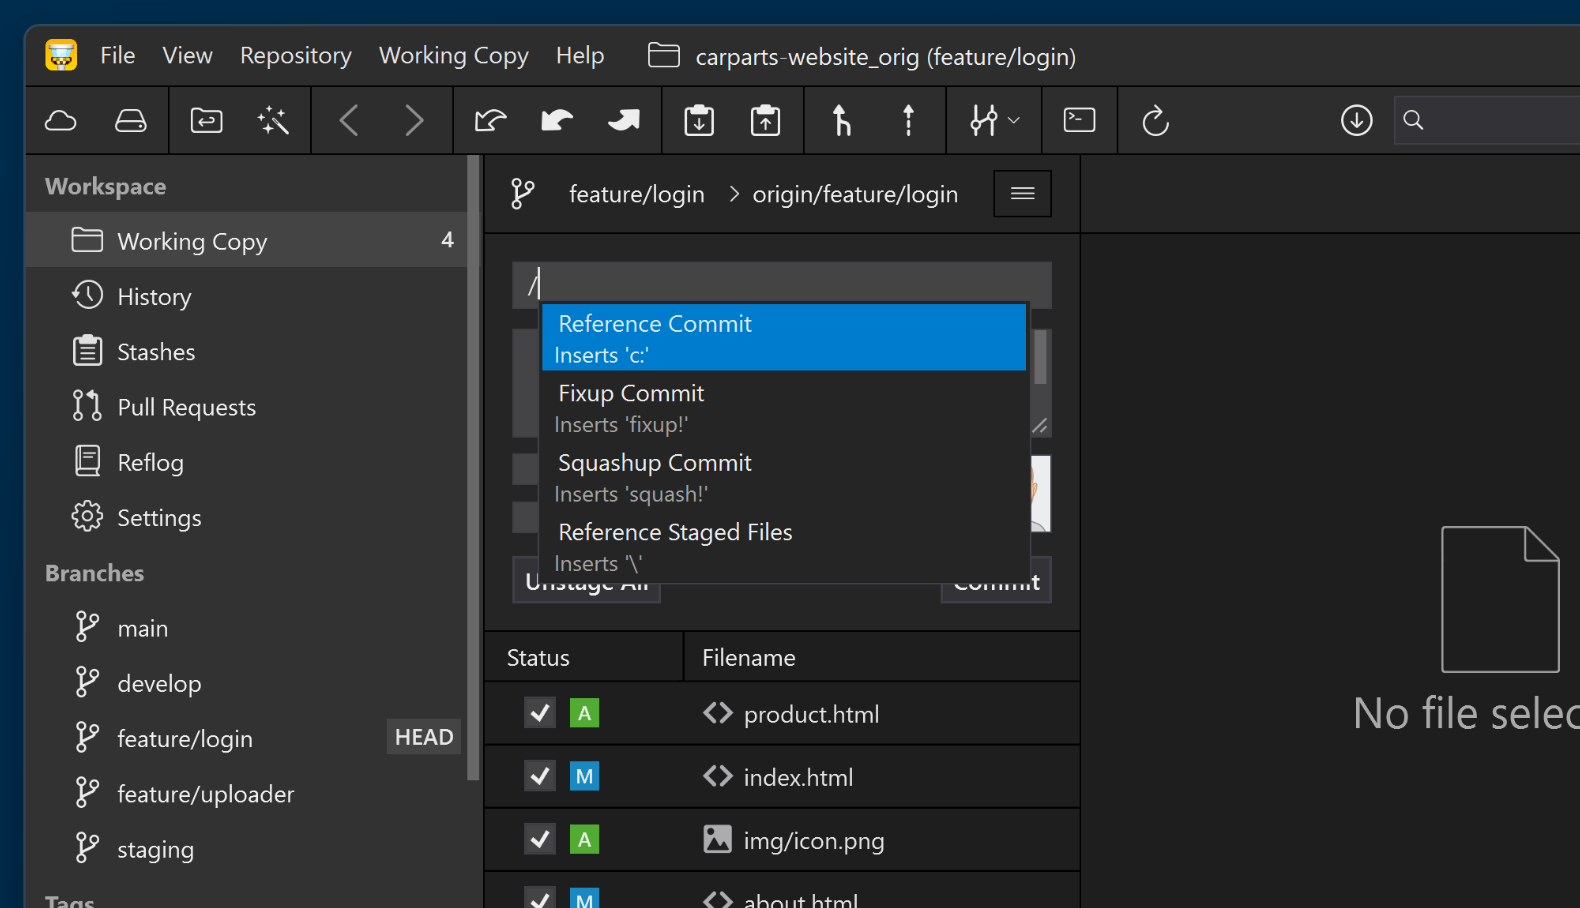
\to insert a file name.c:to reference a commit.#to mention an issue (including keywords like "closes/fixes/resolves"), as long as you've set up a Services account in Tower.
If that seems too much to remember, no need to worry! Just type / in the "Commit Subject" field, and a list of relevant commands will show up.
Once you’ve completed the subject of your commit message, you can simply press ⏎ to move to the "Body" field.
Not a Tower user yet?
Download our 30-day free trial and experience a better way to work with Git!
3. Workflow Tips
Drag and Drop
Let’s take a break from the keyboard and shift our focus to the mouse for a bit. We’re going to look into a favorite feature among many Tower users: the drag and drop functionality!
Creating a New Branch or Tag
You can create a new branch or tag based on a specific commit by dragging and dropping a commit item onto the "Tags" or "Branches" sections in the sidebar.
Additionally, in Tower's sidebar, you can drag a branch and drop it onto the "Branches" section to generate a new branch from the one you dragged.
Pulling, Pushing, Merging, Rebasing, and Branch Tracking
By dragging one branch onto another, you can pull, push, publish, merge, rebase, or track a branch. Press and hold the Alt key before you start dragging to unlock additional operations.
Cherry-Picking
Just like the earlier tip, you can cherry-pick a commit by dragging it from the "History" view to the "Working Copy" item in the sidebar or directly to the HEAD branch.
Moving a Commit
In the "History" view, you can easily move a commit by dragging and dropping it. Keep in mind that this action will rewrite your commit history.
Squashing
To combine multiple commits into a single one, simply click and drag one commit onto another (you will see a "+" symbol). This will aggregate all file modifications into the latter.
When squashing, all commit messages are preserved and combined; however, if you prefer to keep only the original message, hold down the Alt key before dragging to fixup commits instead.
You can also start your commit message with "squash!" or "fixup!" followed by an existing commit.
After adding that commit, navigate to your HEAD branch's history, where you will find a yellow banner at the top to complete the process.
Chunk and Line Staging
In Tower, you have the option to choose specific chunks or even individual lines that you want to commit. If you prefer smaller, detailed commits (which is definitely a good practice!), this powerful feature will be invaluable.
Just click on the lines (or chunks) you want to include in the next commit. You can then review what is staged or unstaged before finalizing the commit.
Undo
In Tower, most actions can be undone by pressing a very familiar keyboard shortcut: CTRL + Z.
As a general rule, try using this combination to reverse any unwanted actions (like a commit, merge, chunk discard, or branch deletion); it should just work as you'd expect! If you need to redo the action, you can do so by pressing ⇧ + CTRL + Z.
Mark as Assume Unchanged
Suppose you need to make modifications to a file locally but don’t wish to commit these changes to the repository. How do you handle this?
If the files are untracked, you can simply ignore or exclude them. However, in this situation, we want to ignore the local changes. To do this, you should use the "Mark as Assume Unchanged" feature.
To apply this, just right-click the file and choose "Mark > Set Assume Unchanged." That’s it!
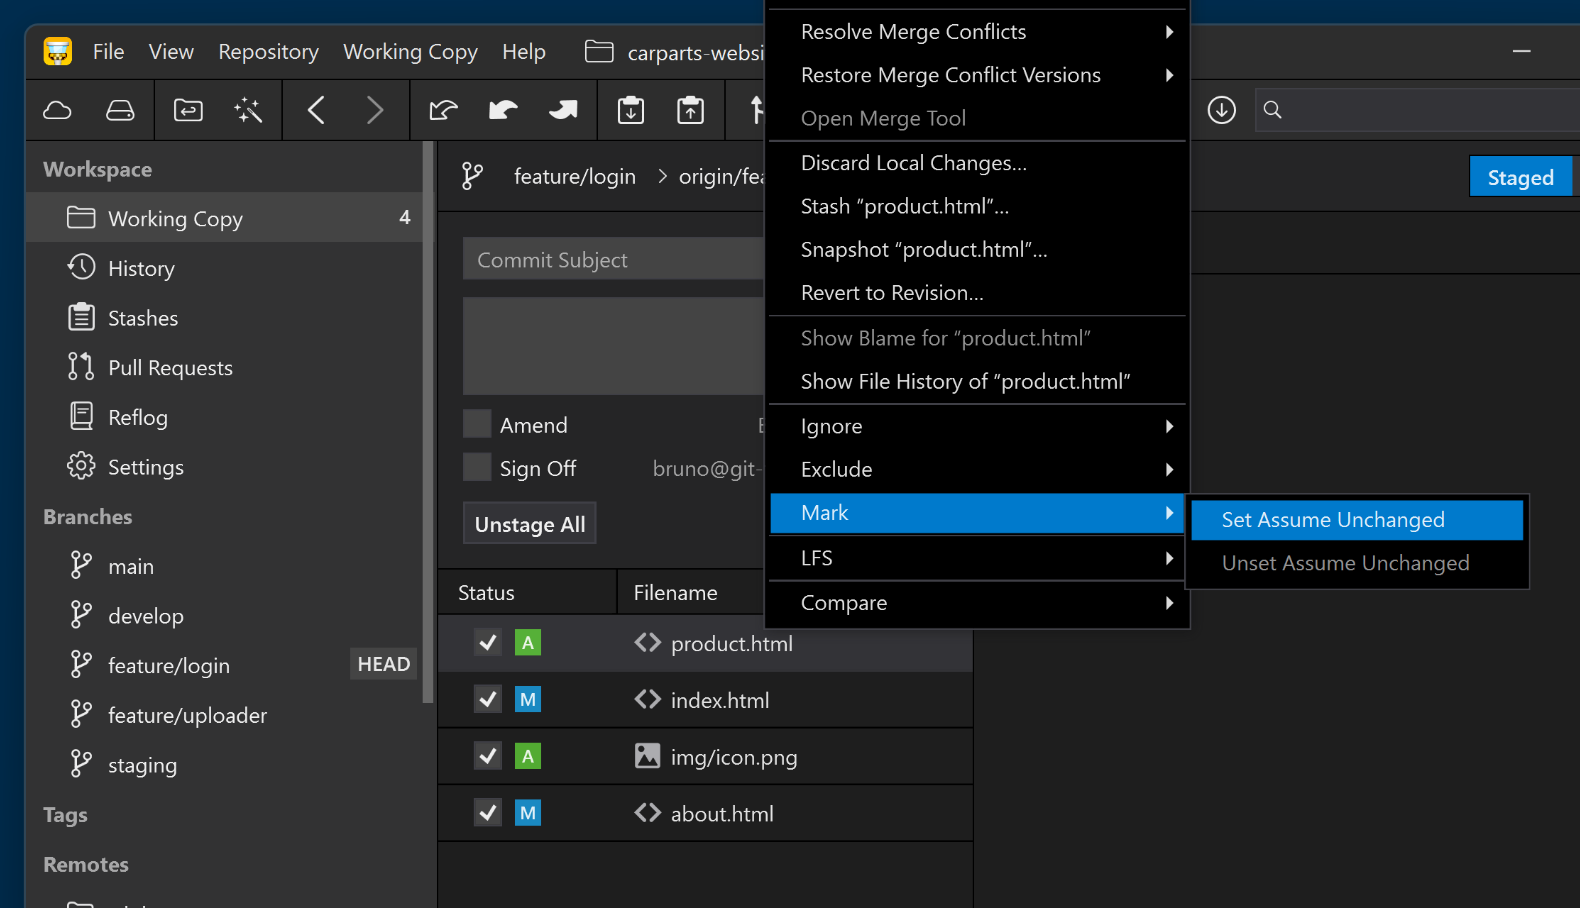
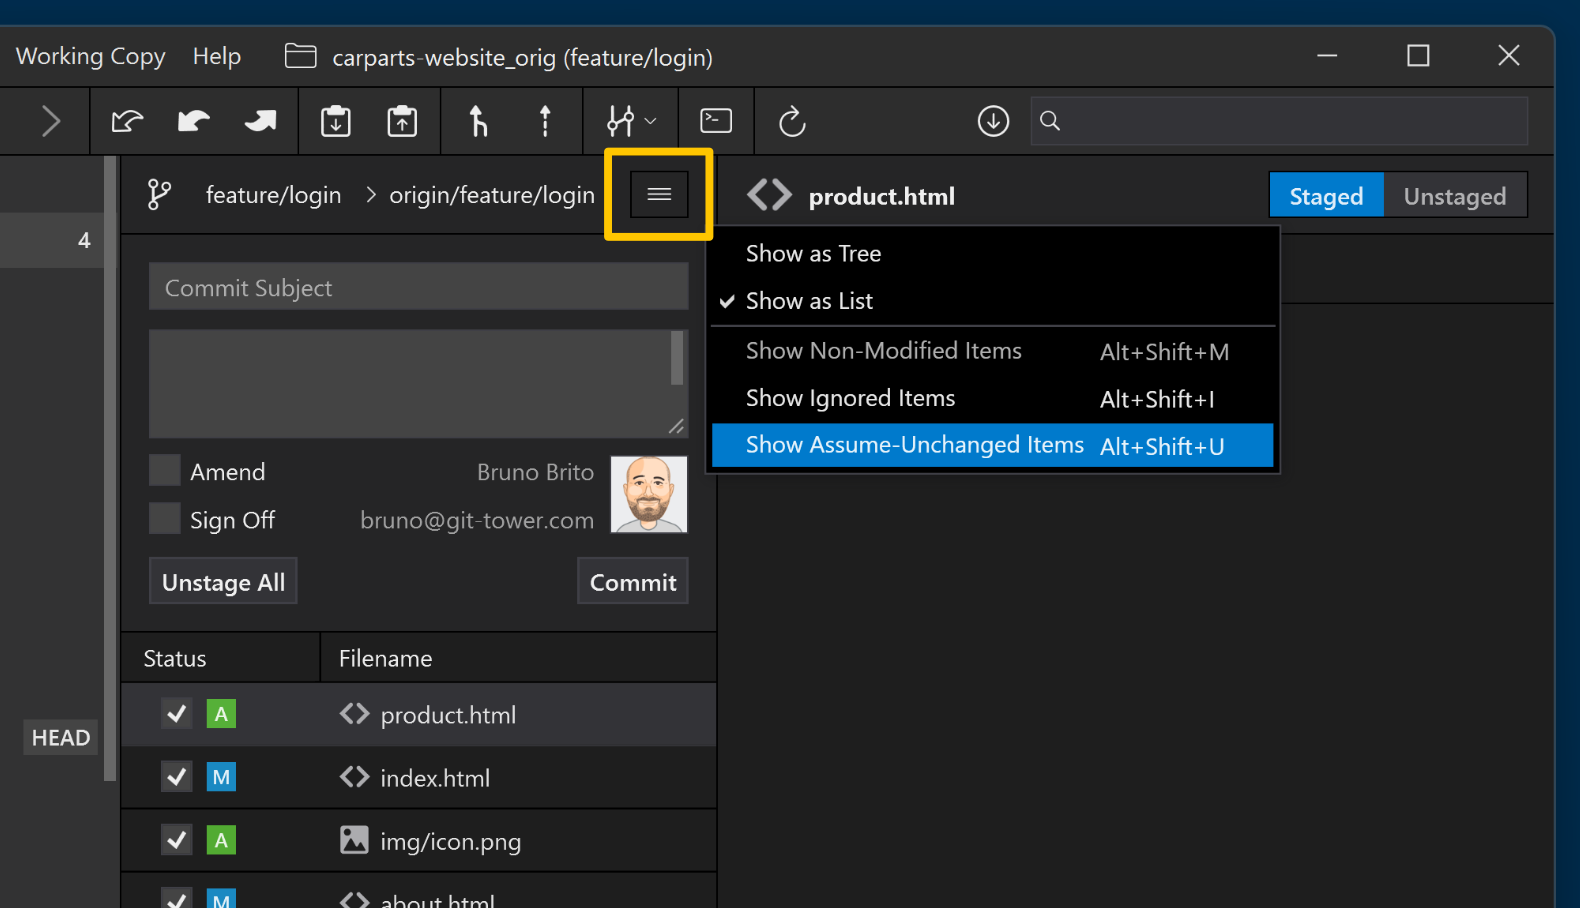
If you later decide to modify this setting, you can easily undo it by pressing CTRL + Z. However, since you might want to adjust this setting again in the future, you can ask Tower to "Show Assume-Unchanged" items by clicking the "Additional View Options" button, as highlighted in the screenshot below:
"Working Copy" View Modes
Now is a good opportunity to remind you that Tower offers different "Working Copy" view modes!
By default, Tower displays only the modified files in a list format, but you can view all your project files by selecting "View as Tree" and then "Show Non-Modified Items."
It is quite useful when you need a comprehensive overview of your project's files!
Accessing File History (and Restoring Previous File Versions)
You can combine the previous tip with this one to quickly review how a file has changed over time or to revert to a prior version.
Right-click on any file and choose "Show File History" to see all the commits that have affected that specific file. Once you find the commit that interests you, right-click on it and select "Restore [FILE] at Revision [REVISION]" to bring that version back into your working copy.
Keep in mind that this action will overwrite any existing local changes to those files!
Alternatively, you can click on "Export [FILE] at Revision [REVISION]" to download a ZIP file containing that version of the file (or the complete file tree from that revision, as shown below).
Stashing
Stashing is a crucial action to take when you need to save your uncommitted changes and leave your working directory clean — for instance, if you need to pull updates to the branch or switch to a different branch.
You can stash your work by pressing CTRL + S. To apply your stashed changes, use CTRL + ⇧ + S. If you find yourself frequently stashing and applying your changes right after, consider using Tower's "Snapshot" command instead: it saves a copy of your current working copy's state and immediately applies it, allowing you to maintain your momentum.
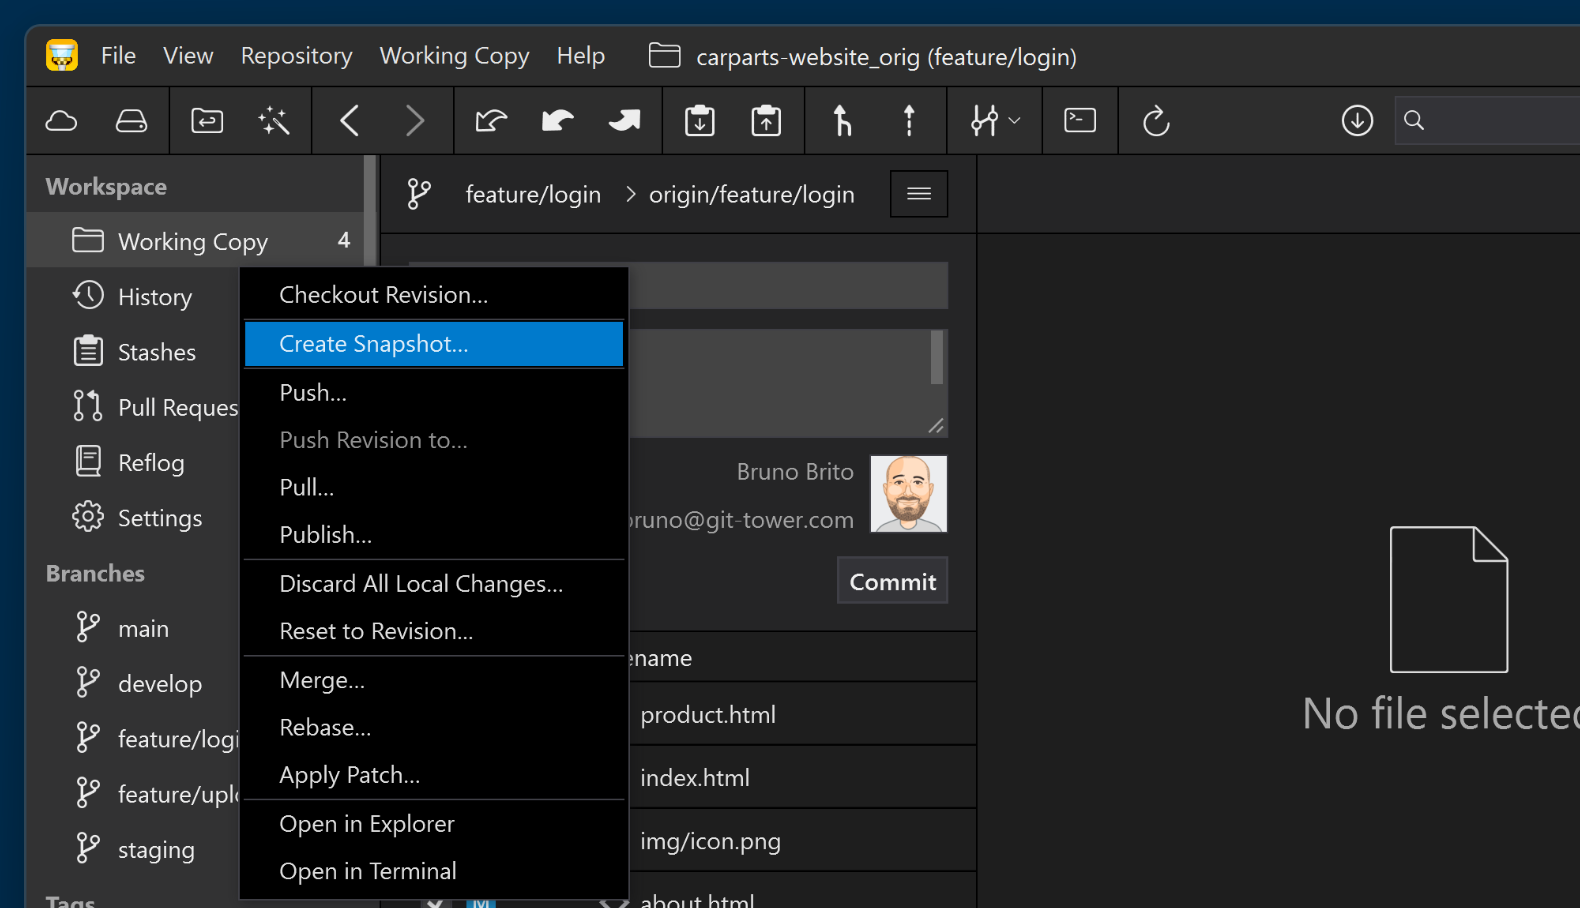
Snapshots can also be found in the "Stashes" view, alongside your other stashes. You can easily create a snapshot of your entire working copy by right-clicking on the "Working Copy" view and selecting "Create Snapshot...".
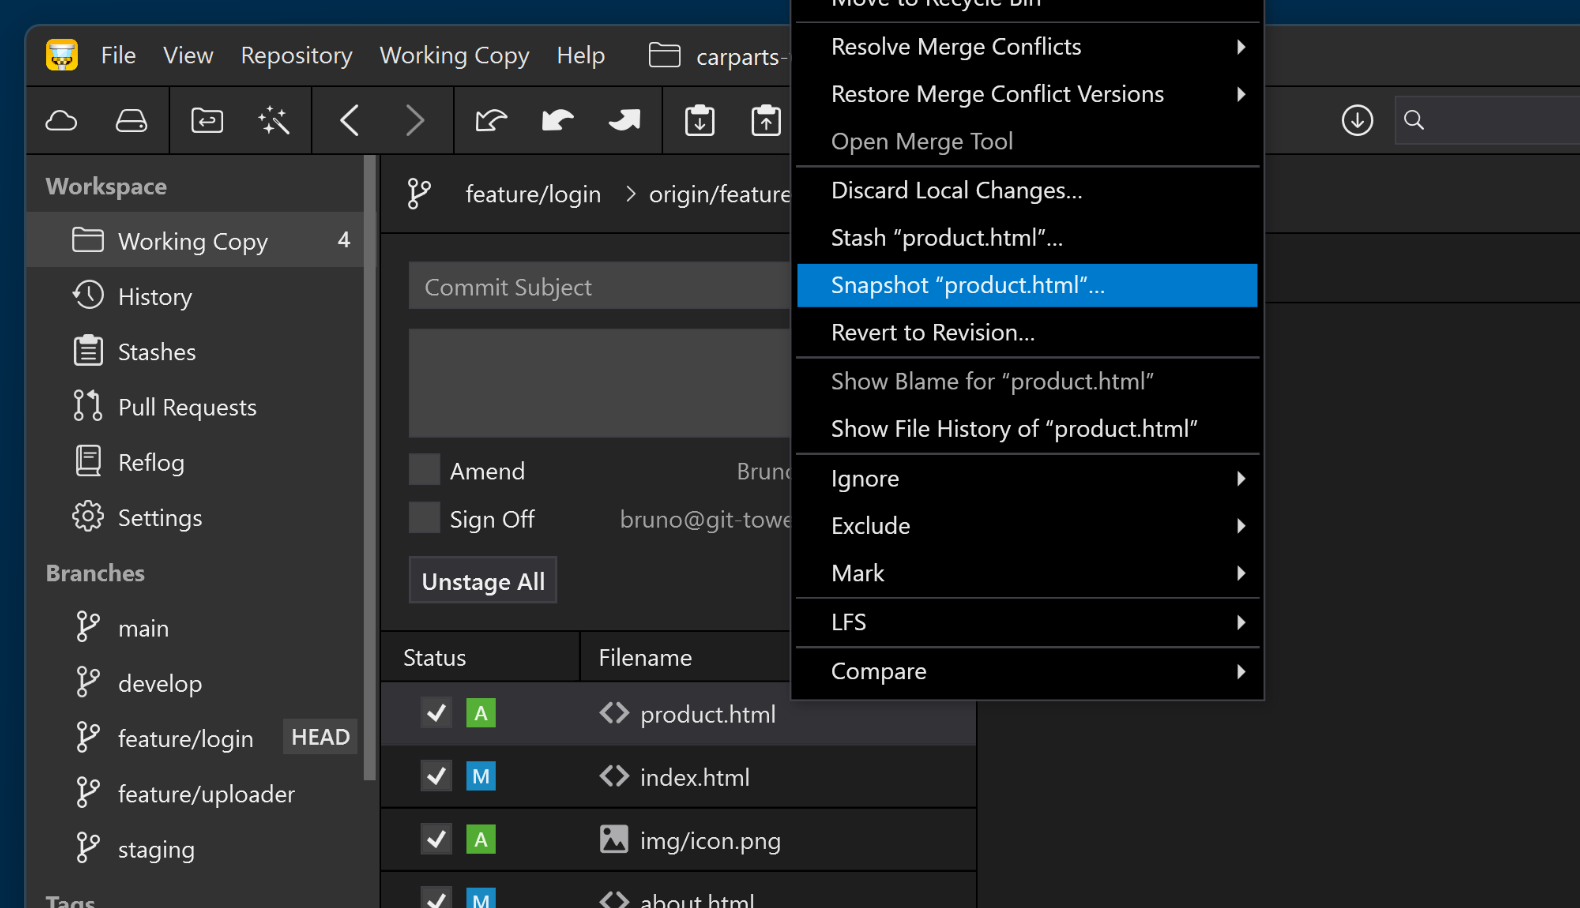
Alternatively, you can stash (or create a snapshot of) a single file by right-clicking on it in the working copy view and selecting the appropriate option:
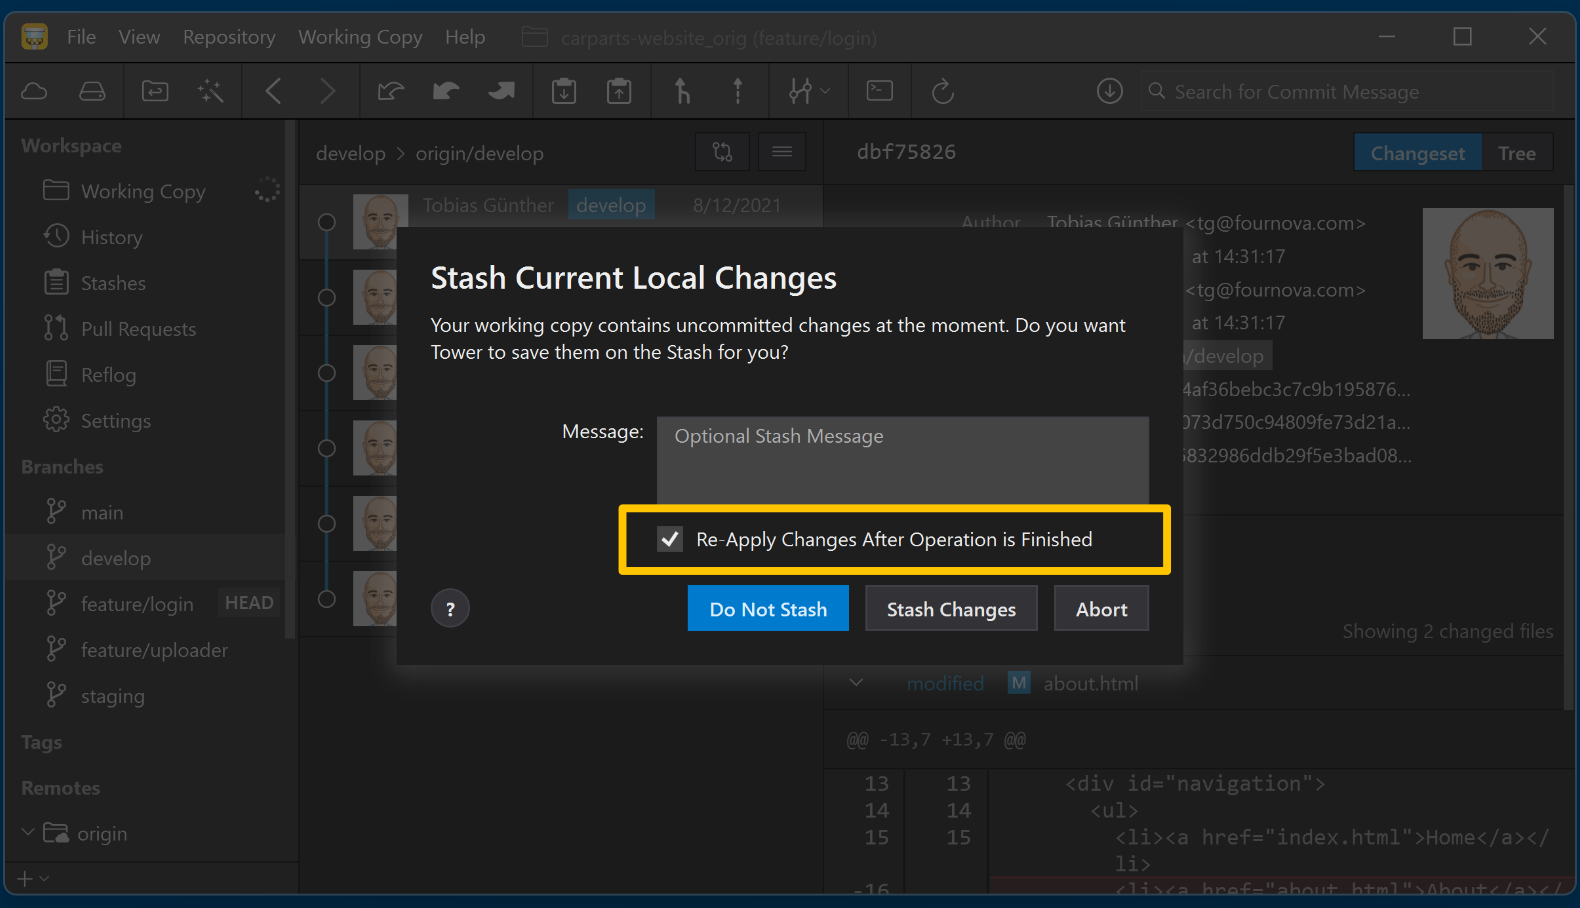
If you try to switch branches while your repository is dirty, Tower will prompt you to stash your files. If you want to carry your changes over to the new branch, check the "Re-apply Changes After Operation is Finished" box — this will automatically stash your changes, switch branches, and then apply those changes (similar to the git switch command).
Rebase Onto
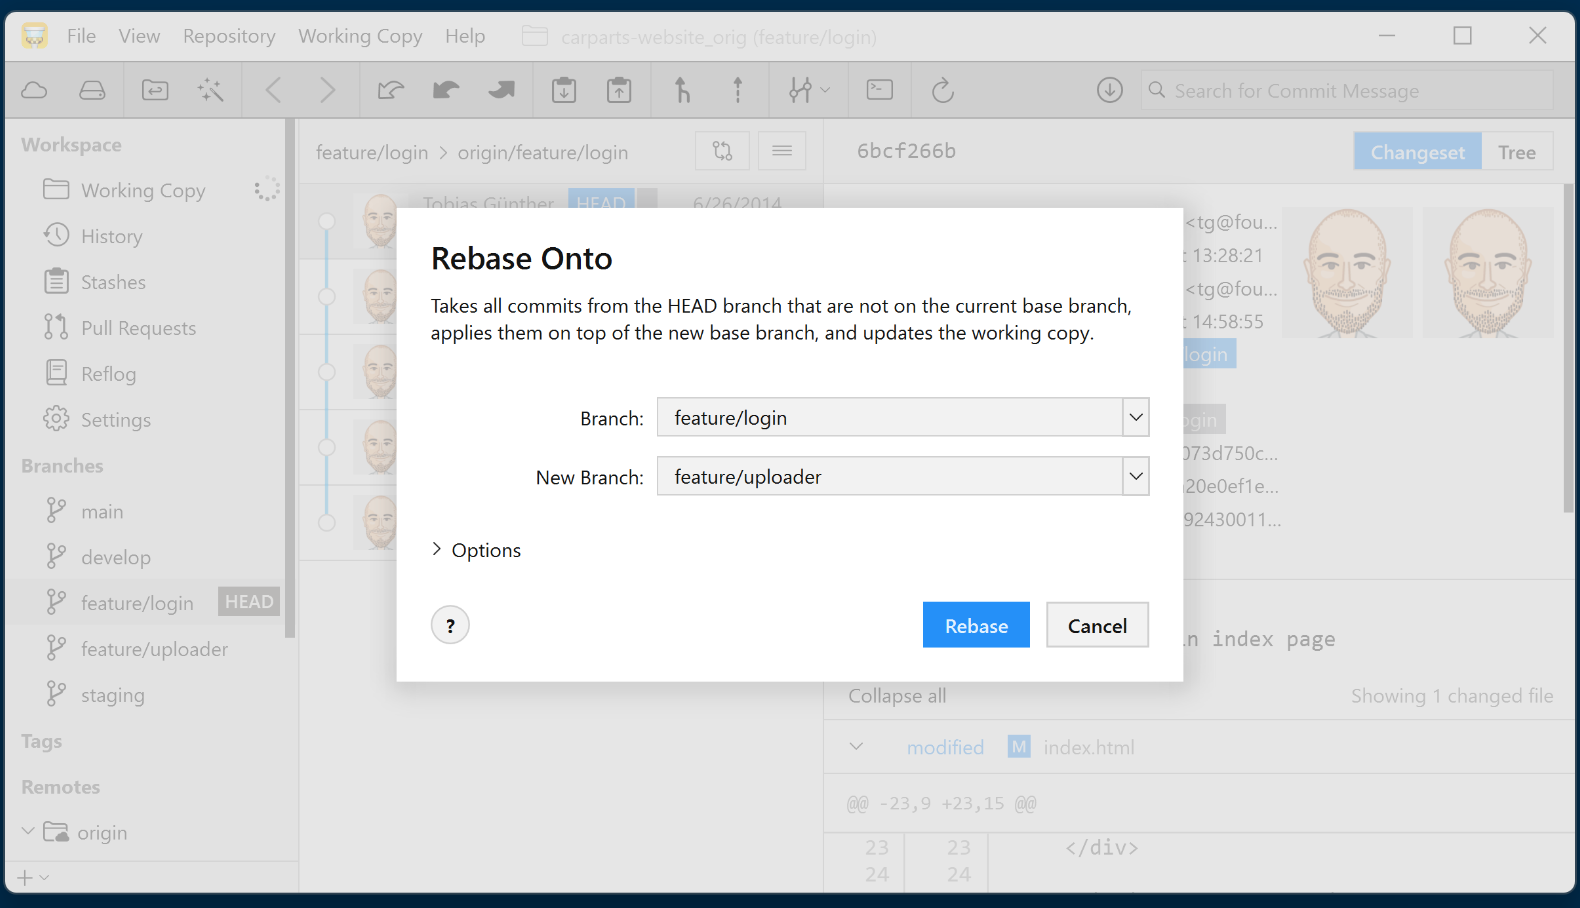
The "Rebase Onto" command is useful when you want to take all the commits from the current HEAD branch that aren't present in the current base branch and apply them to a new base branch. This is typically used when you wish to change the base of a feature branch to another branch.
You can perform this action by right-clicking the HEAD branch and selecting "Rebase Onto Revision…".
4. Settings to Tweak
Setting a Default Cloning Directory
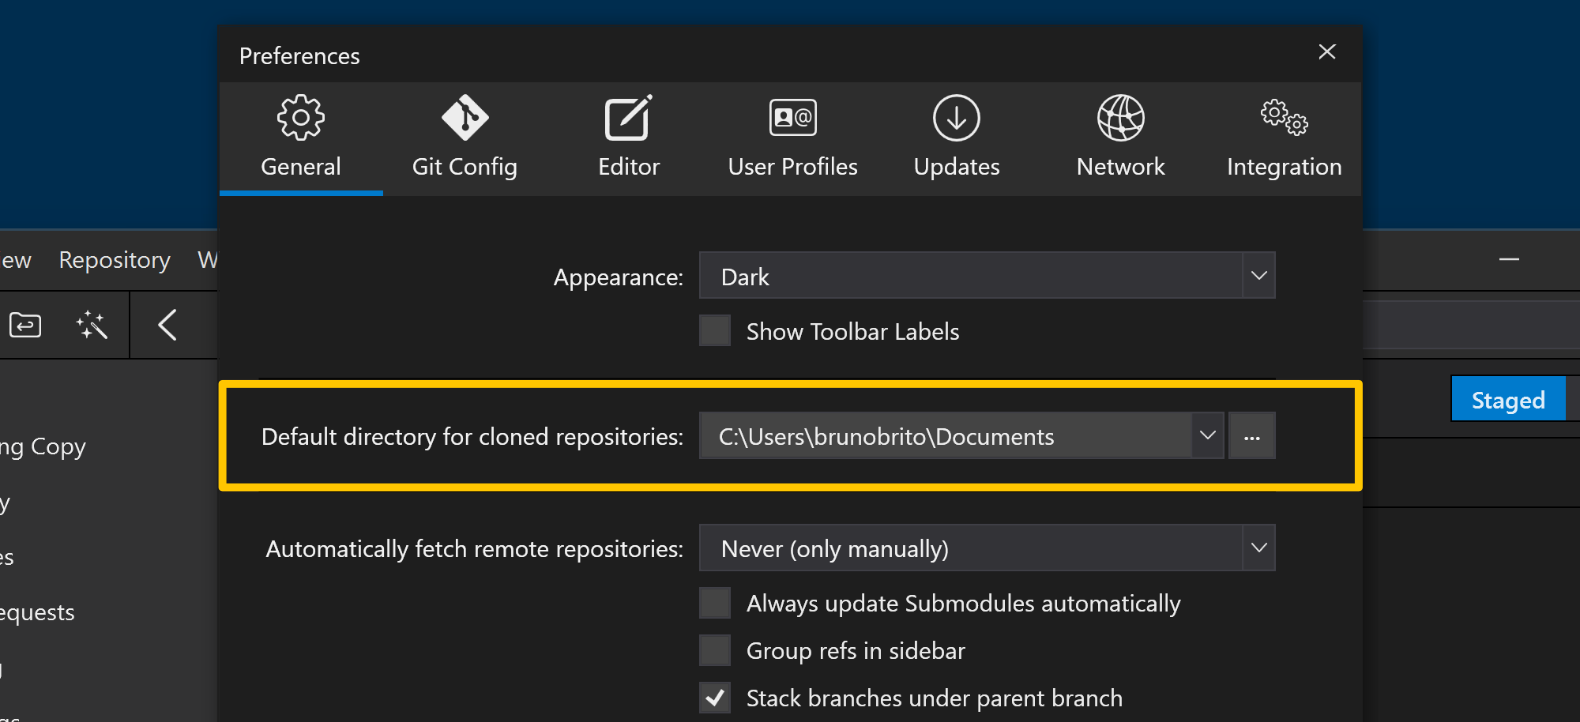
Do you frequently clone repositories? Make sure you're cloning them to the correct folder!
Navigate to the "General" tab in the Preferences window to specify your default directory for cloned repositories.
Automatic Signing of Commits and Tags (GPG and SSH)
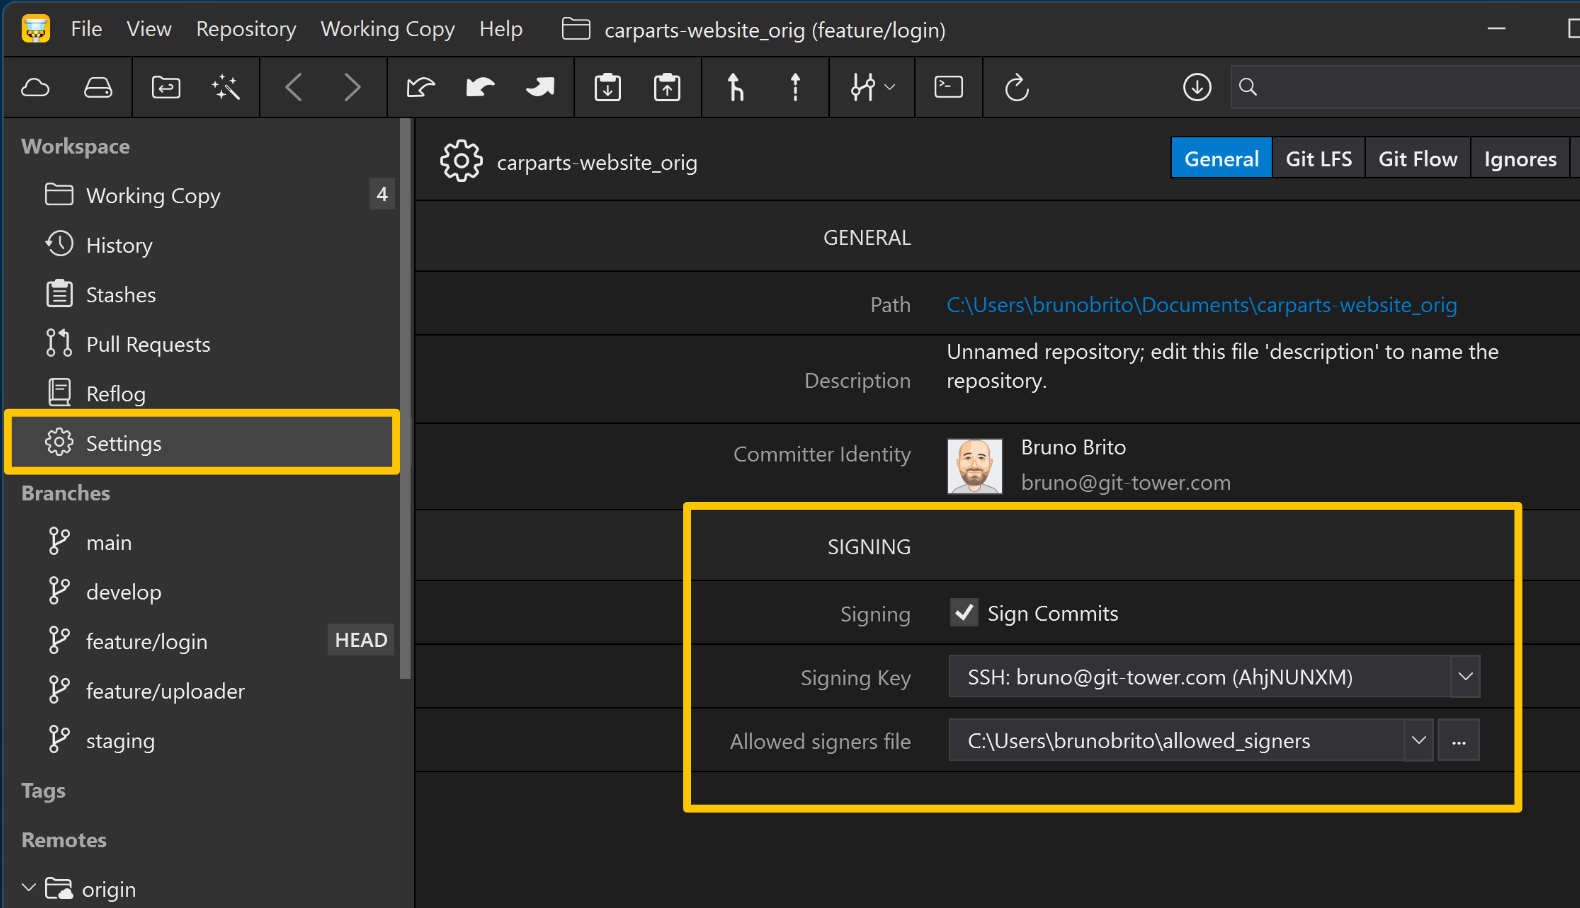
Tower offers integrated support for GPG and SSH, enabling it to automatically sign your new commits. This feature extends to other actions like merging and cherry-picking as well.
You can apply this setting globally by going to the "Git Config" tab in the Preferences, or you can restrict it to specific Git repositories by accessing the "Settings" view in the sidebar.
Additionally, you can easily sign tags automatically by ticking the checkbox in the "Create New Tag" dialog.
Changing Author Profiles
To conveniently alternate between different identities when making commits, you can create multiple user profiles in Tower's "User Profiles" section within the Preferences window. It's also possible to assign distinct GPG or SSH keys for each profile.
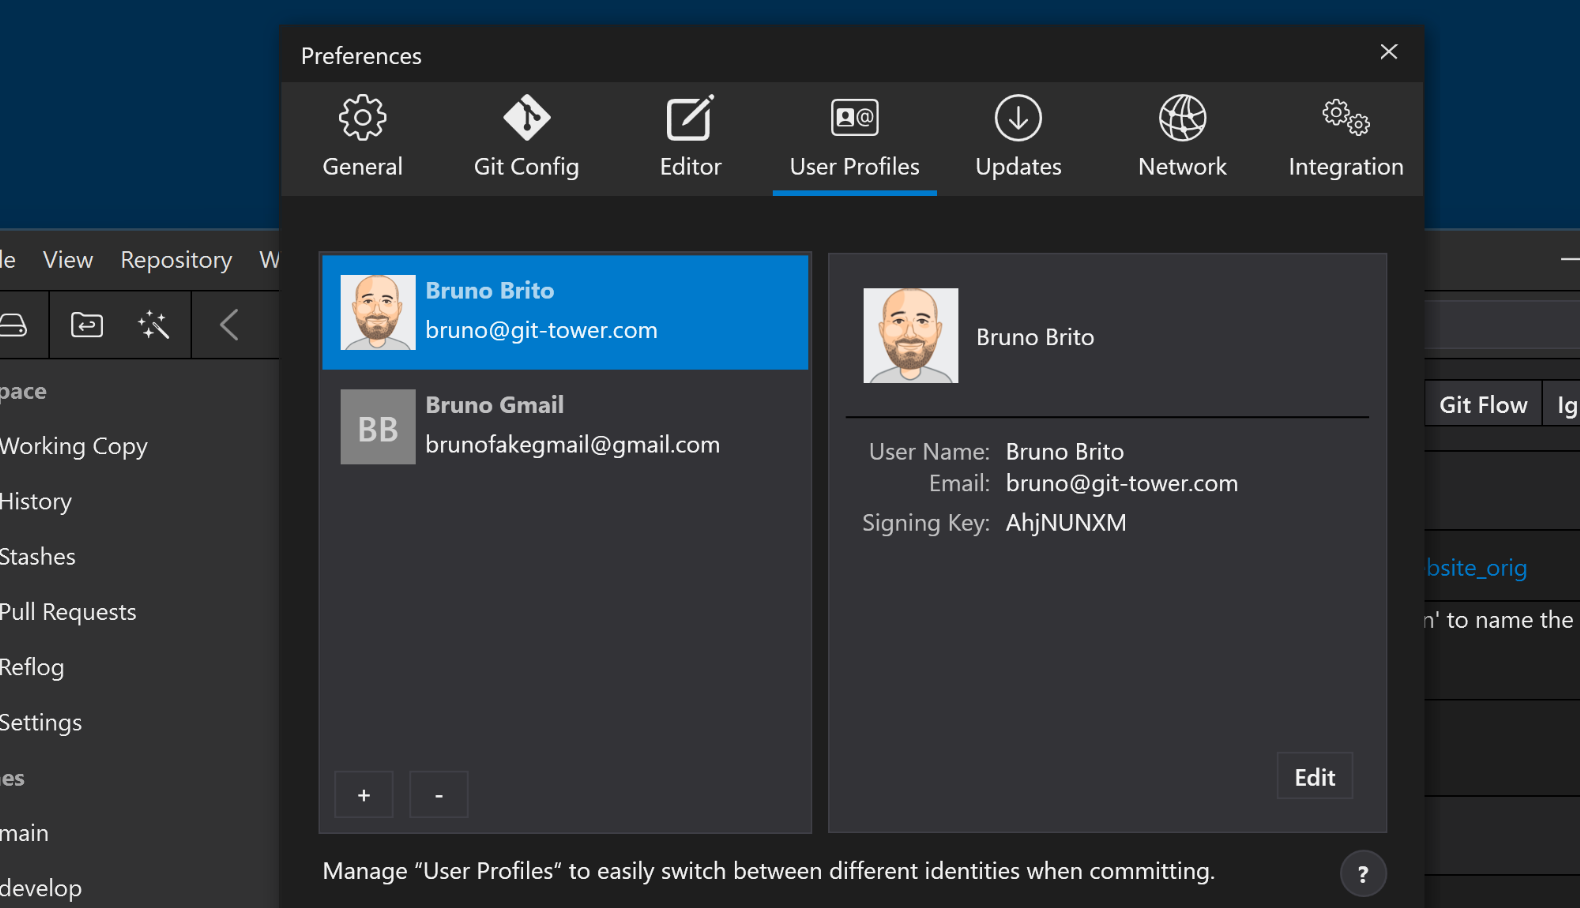
You can switch identities prior to committing in the "Working Copy" view, or set the default identity for that particular repository in the "Settings" view.
5. Powerful Features (That You May Not Be Aware Of)
Image Diffing
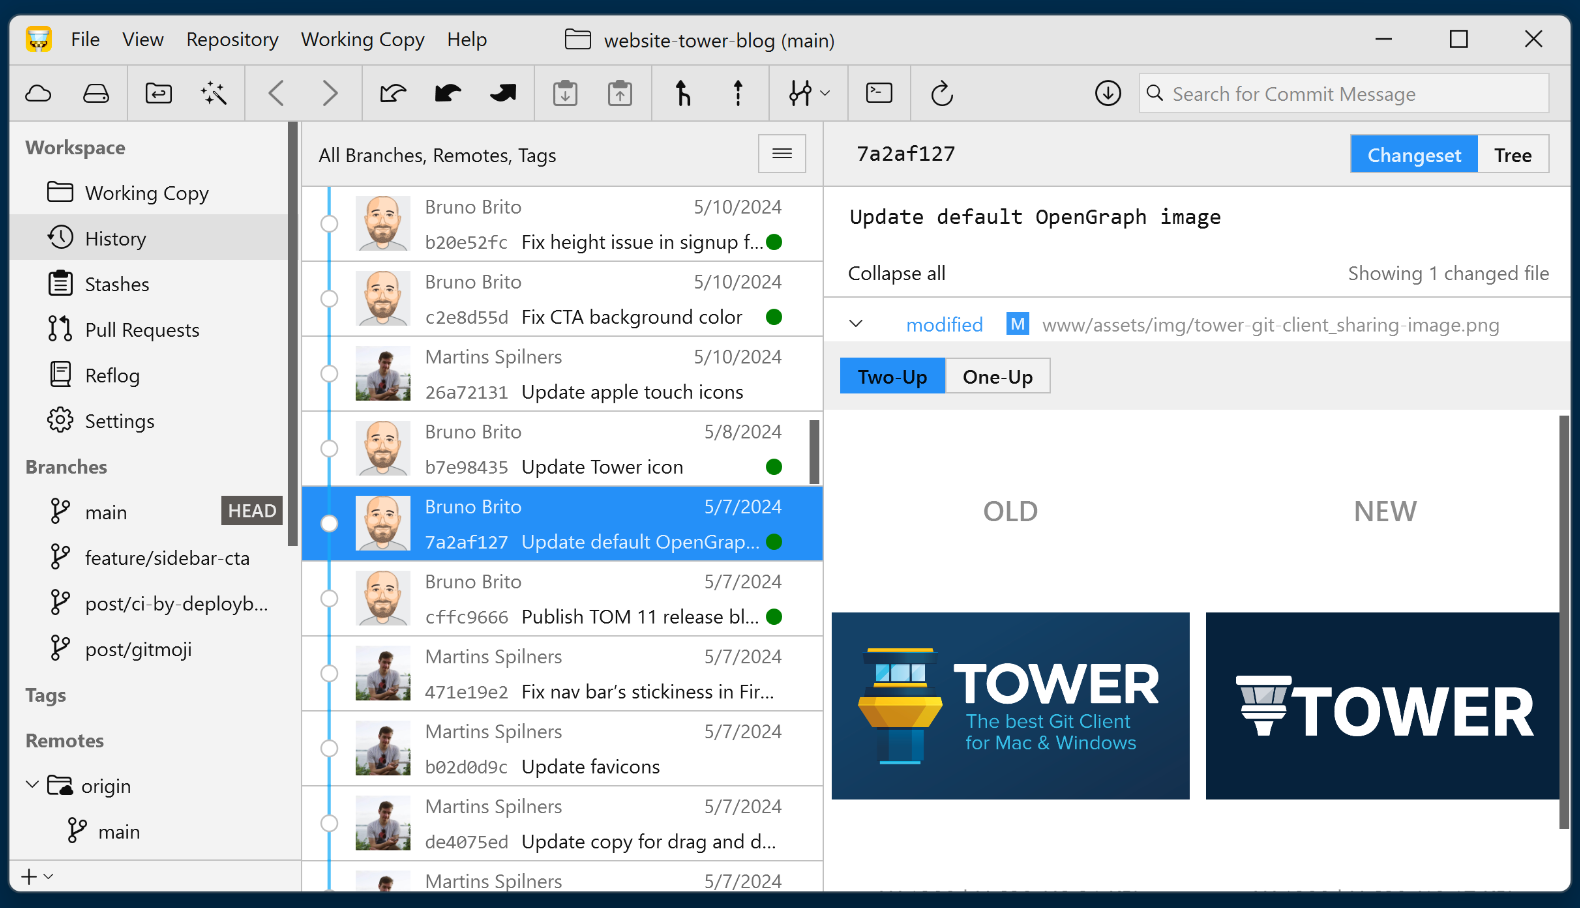
Tower comes with a built-in "Image Diffing" feature that accommodates all the most widely used file formats, including PNG, JPG, GIF, BMP, TIFF, and JPEG2000.
I found this feature particularly valuable when I optimized hundreds of images and wanted to review the outcome by comparing the original and compressed images (along with their file sizes) side by side.
It's also extremely useful during rebranding efforts!
Advanced Filtering
Our "Search" function allows you to filter commits by Author, Date, Message, Commit Hash, or File. However, did you realize that you can combine these search criteria?
This is incredibly useful when you need to find commits from a coworker within a specific time period!
Final Words
You've made it to the finish line! Congrats: you're now a Tower for Windows ninja! 🥷
I hope you found this guide useful! If you're interested in learning more, check out our documentation; we cover not only Tower but also Git and version control.
To stay updated on Tower and get additional programming tips, be sure to follow our blog, subscribe to our newsletter below, or connect with us on on X/Twitter and LinkedIn! ✌️
New Series: "10% More Productive"
This is part 8 of our series titled "10% More Productive". Be sure to check out our tips on:
- Mastering the Keyboard
- Mastering Sublime Text
- Mastering the Terminal
- Mastering Tower for Mac
- Mastering Google (for Developers)
- Mastering macOS
- Mastering SEO for Developers
- Mastering Tower for Windows ← you are here!
Sign up for our newsletter to get notified about the next episode!
